Coursework - Highlights
Dissertation - Generation of Islands and Simulating Climate Change using OpenGL
My dissertation is available to read online(.pdf) at the link above.
Most images on my portfolio can be enlarged by holding down the left mouse button on the image
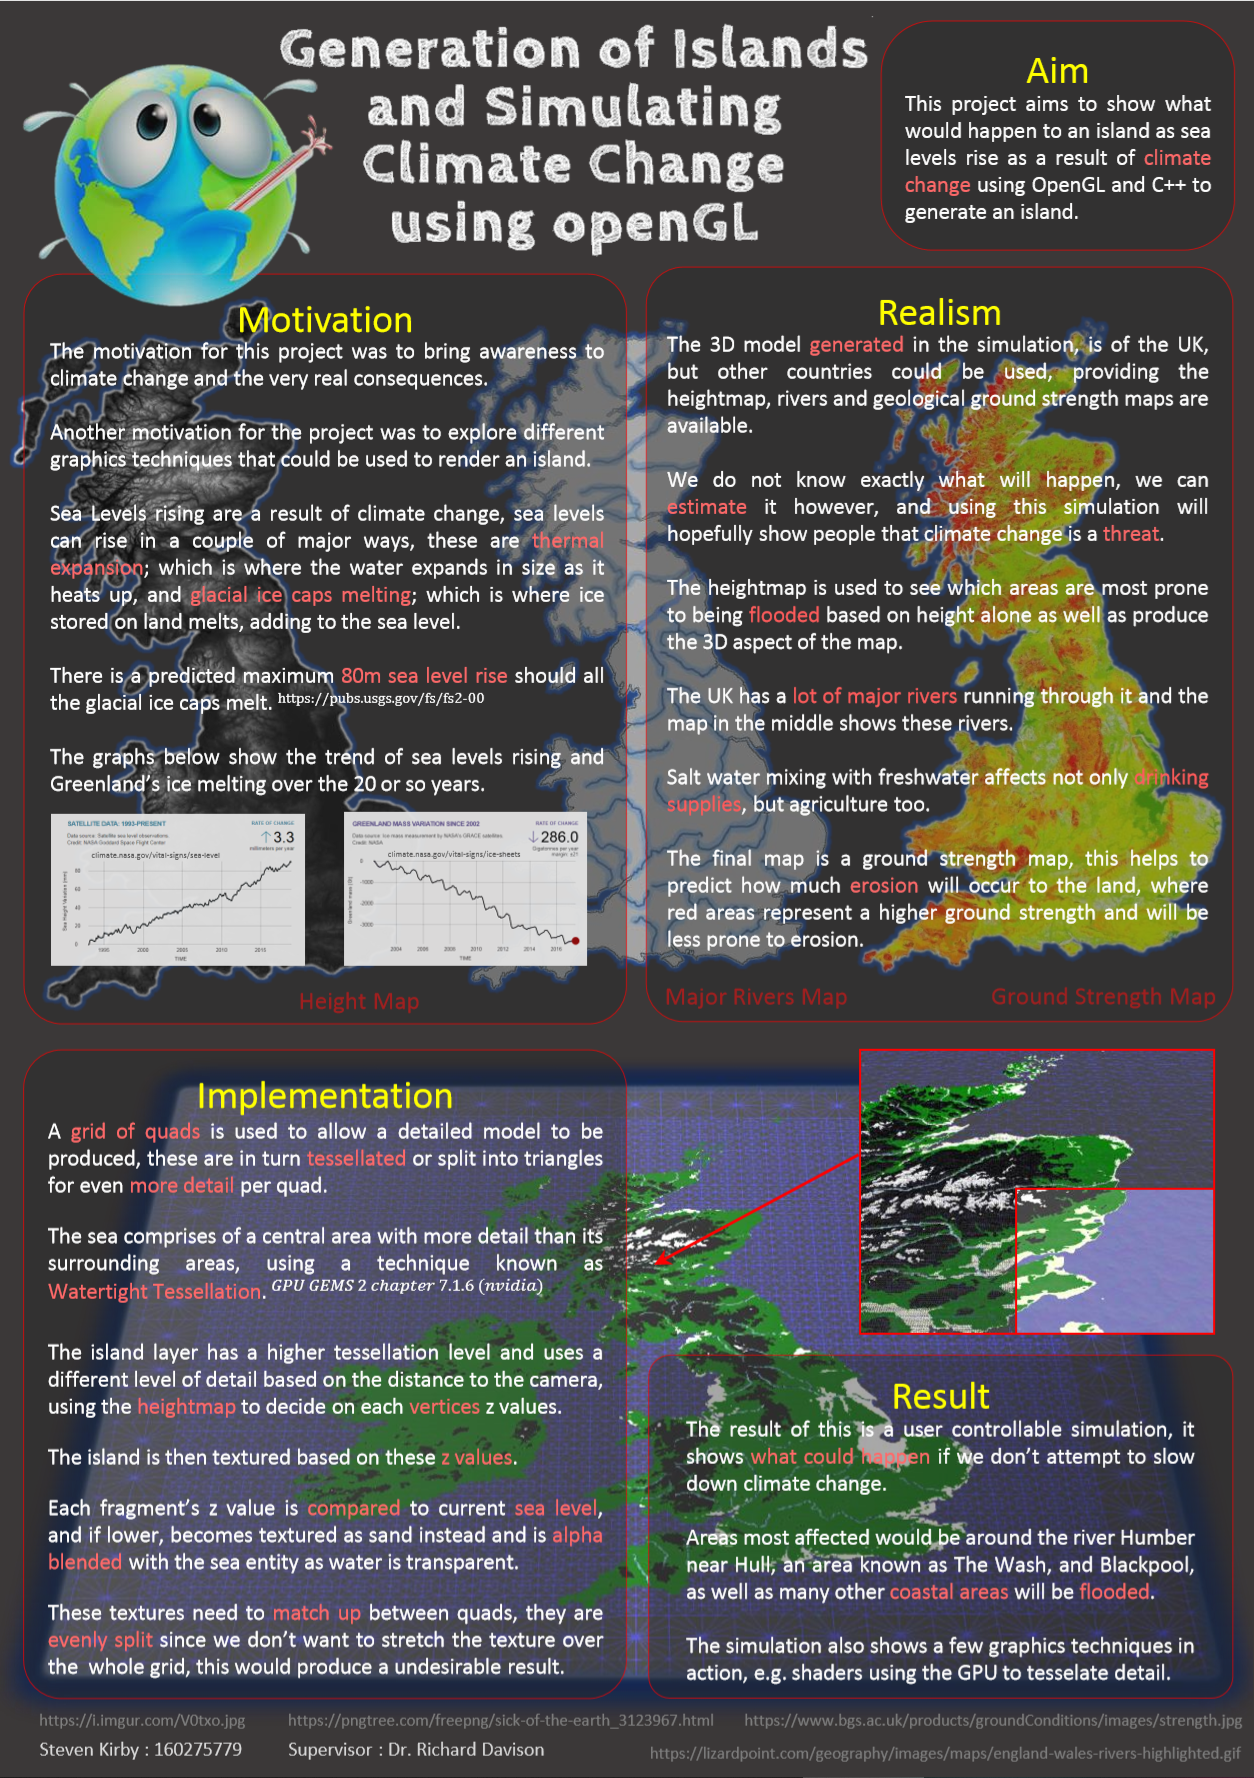
Poster
For my 3rd year dissertation I wanted to explore graphics within programming as I had never quite grasped how to implement them.
Tackling this topic enabled me to explore the belly of the beast, I utilised a codebase provided to us during the graphics module I was doing that year.
This provided a framework in which to easily set up a window using OpenGL as well as a few other features, however understanding the codebase I had never used before made this slightly more difficult; albeit increasing my confidence in using another programmers complex code.
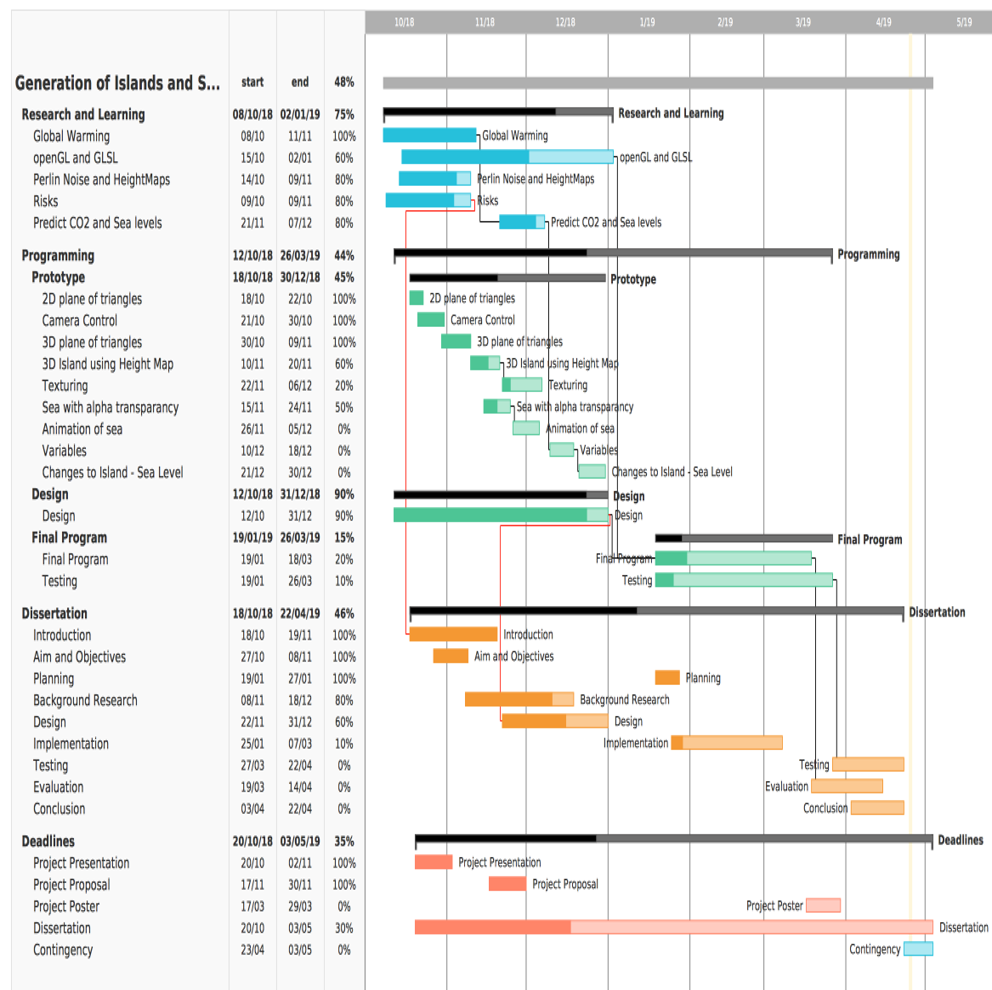
Planning - Gantt Chart
In order to organise my dissertation I used a Gantt chart which changed over time as needed.
I enjoy games with wide open worlds that can be explored, and naturally wanted to generate random islands to replicate this, this changed after discussion with my tutors.
The biggest change was to incorperate climate change and rising sea levels, which are returning to the forefront of issues we face once again.
I made the decision to use heightmaps of the UK rather then randomly generated islands, in hopes of making people aware that these are real issues, not just an interesting graphics demo.
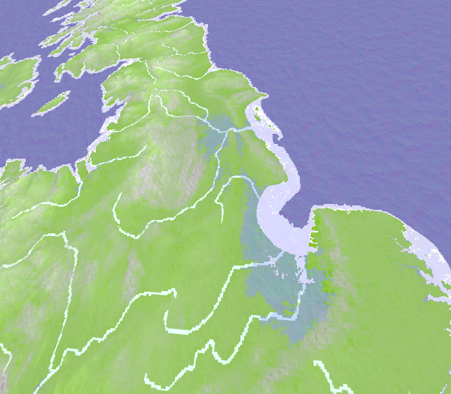
The Result
This project was a challenging experience for me, however I managed to achieve what I had set out to do, albeit not as pretty as I would have liked.
The image shows the erosion and the inundation of water upon the UK after the sea level had risen.
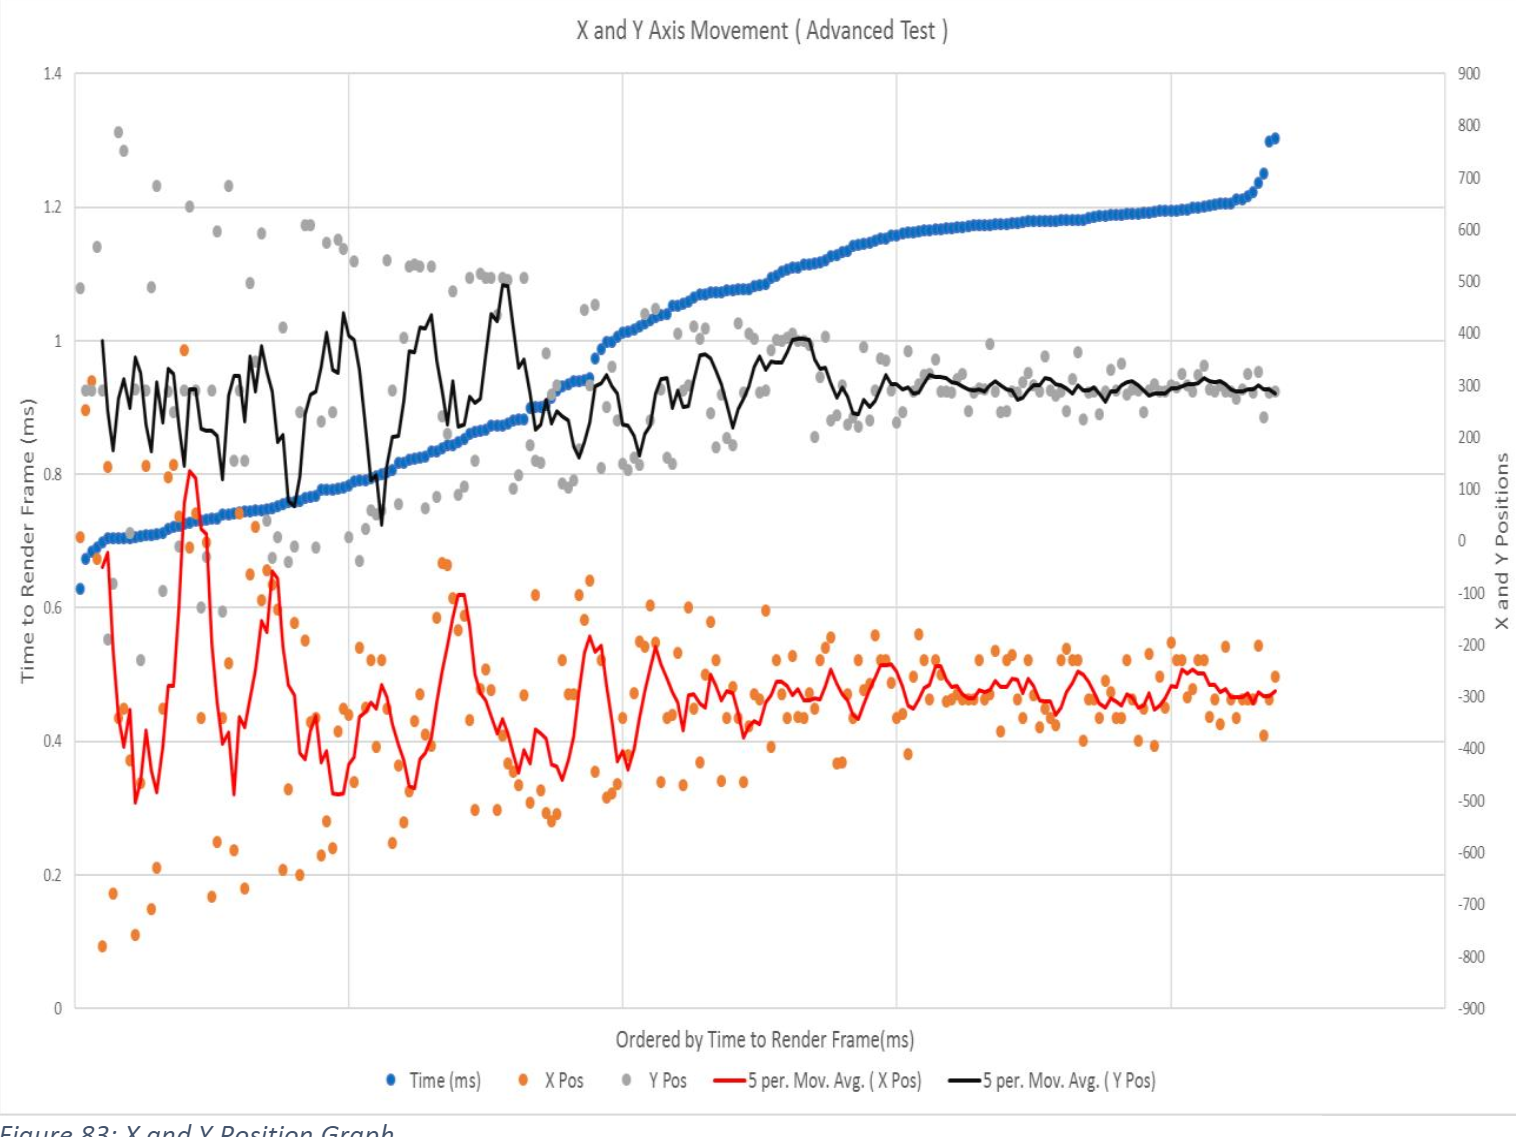
Data Analysis Graph
Another aspect of this dissertation I enjoyed was the data analysis of testing performance of the simulation with different detail or tesselation levels, amount of textures being rendered etc.
This is just one example of the graphs I produced in Excel, this particular graph using the fps, x and y position of the 'camera' to see how much the render times/fps were effected by how much of the model was showing on the screen.
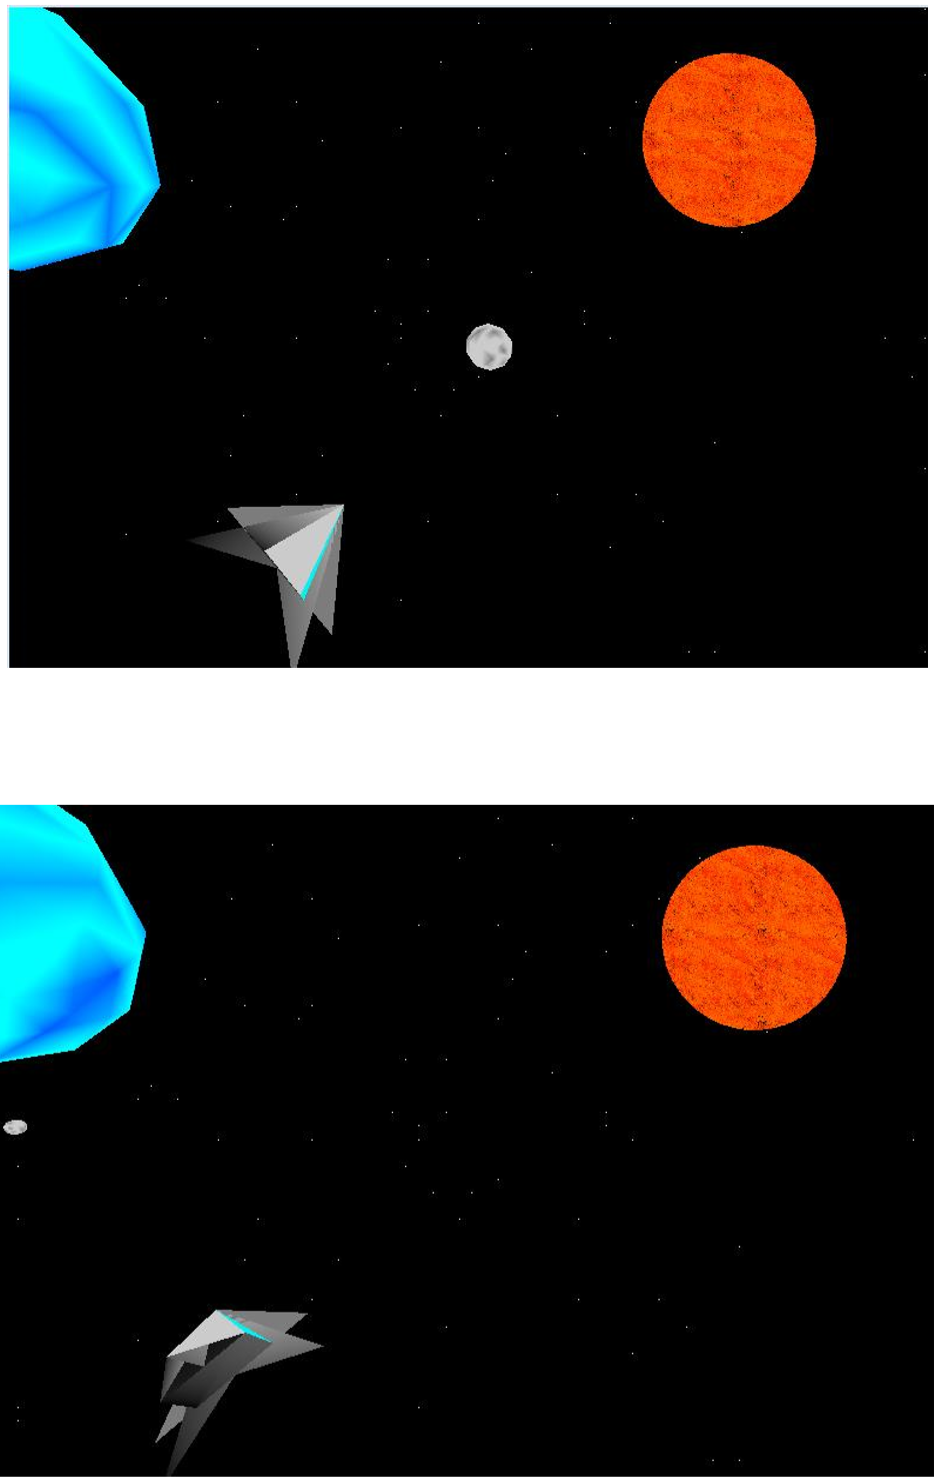
Assignment 1 - Space Scene
Using OpenGL to create a space scene which needed to incorporate the sun, stars, a planet and a spaceship (user controlled).
I also added in a moving comet which randomly starts at a location in the distance and flys towards the player, when leaving the screen it starts somewhere randomly in the distance again.
Assignment 2 - Shaders
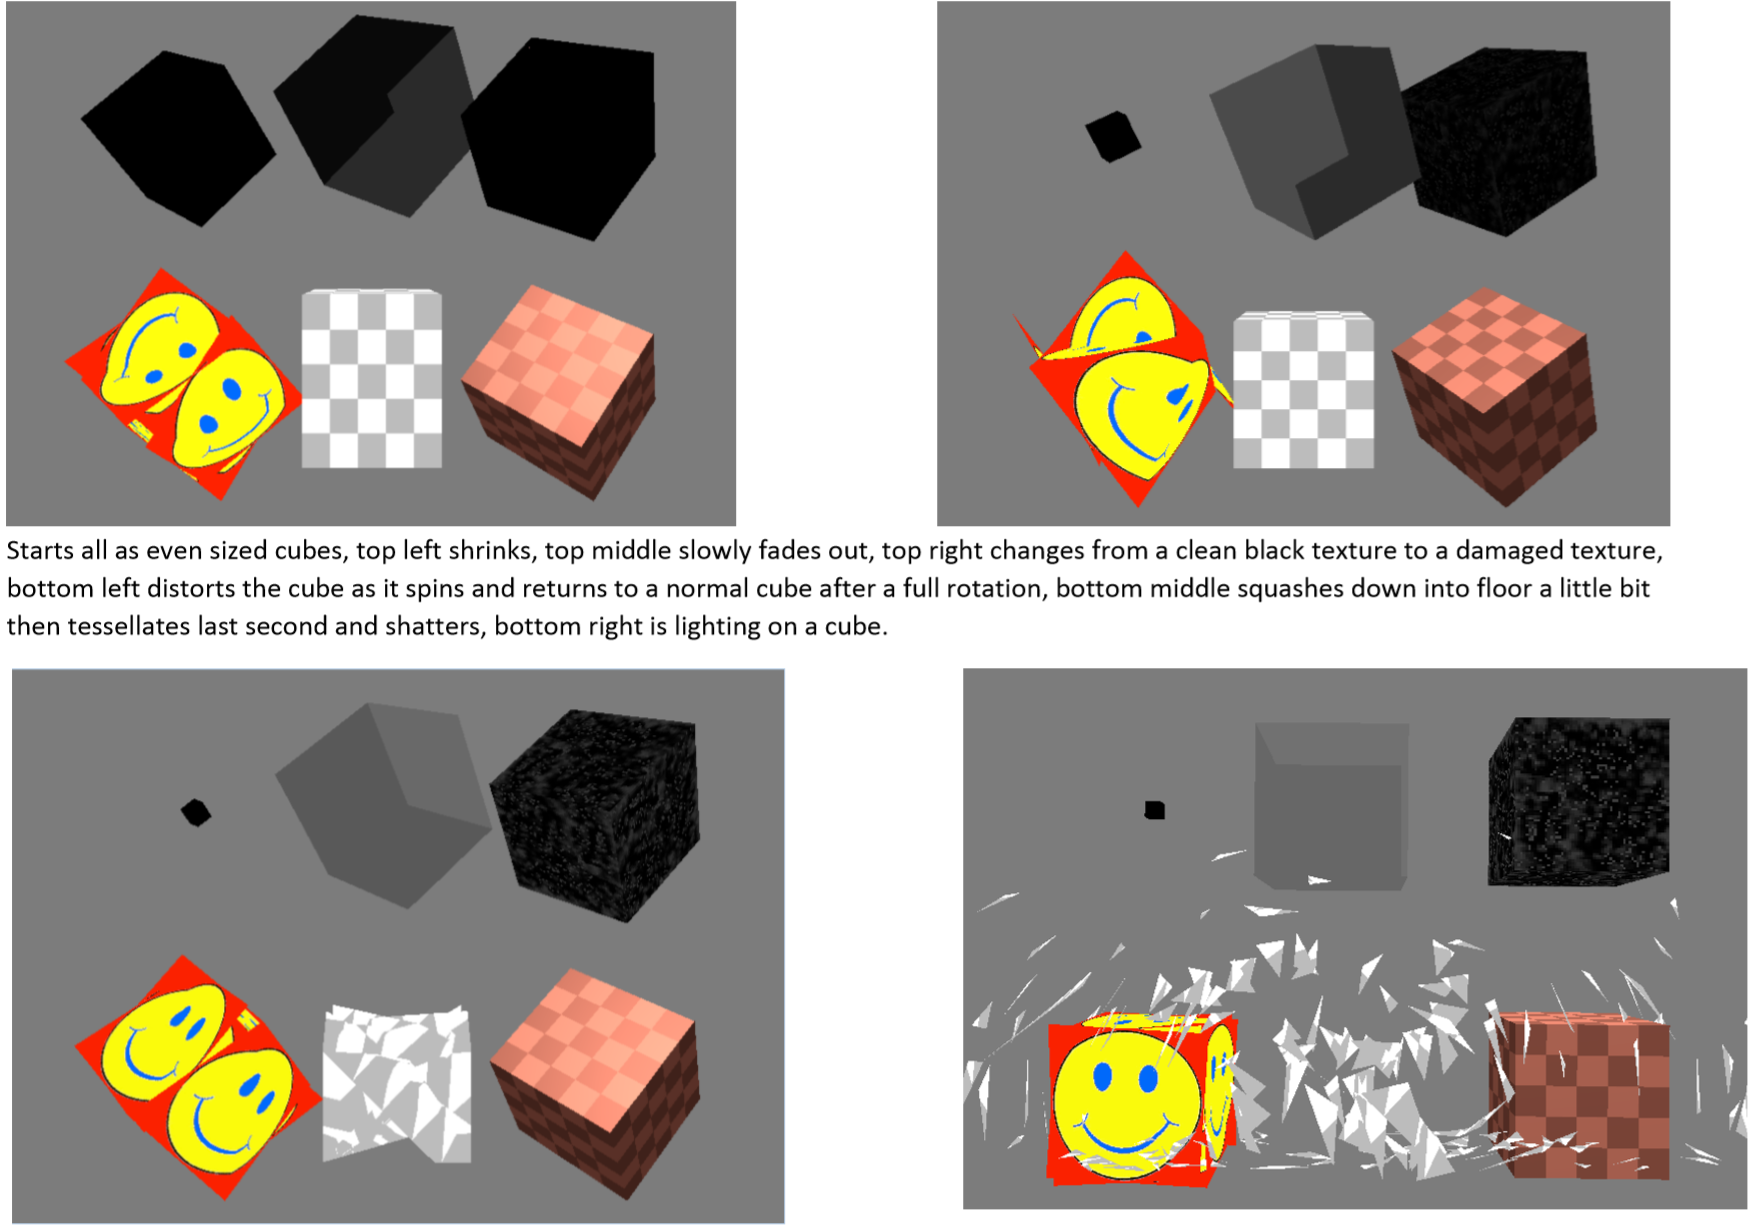
Using OpenGL and GLSL I was to create four requested effects on cubes, and come up with two of my own.
The two that I came up with on my own were the shattering cube and the twisting smiley cube.
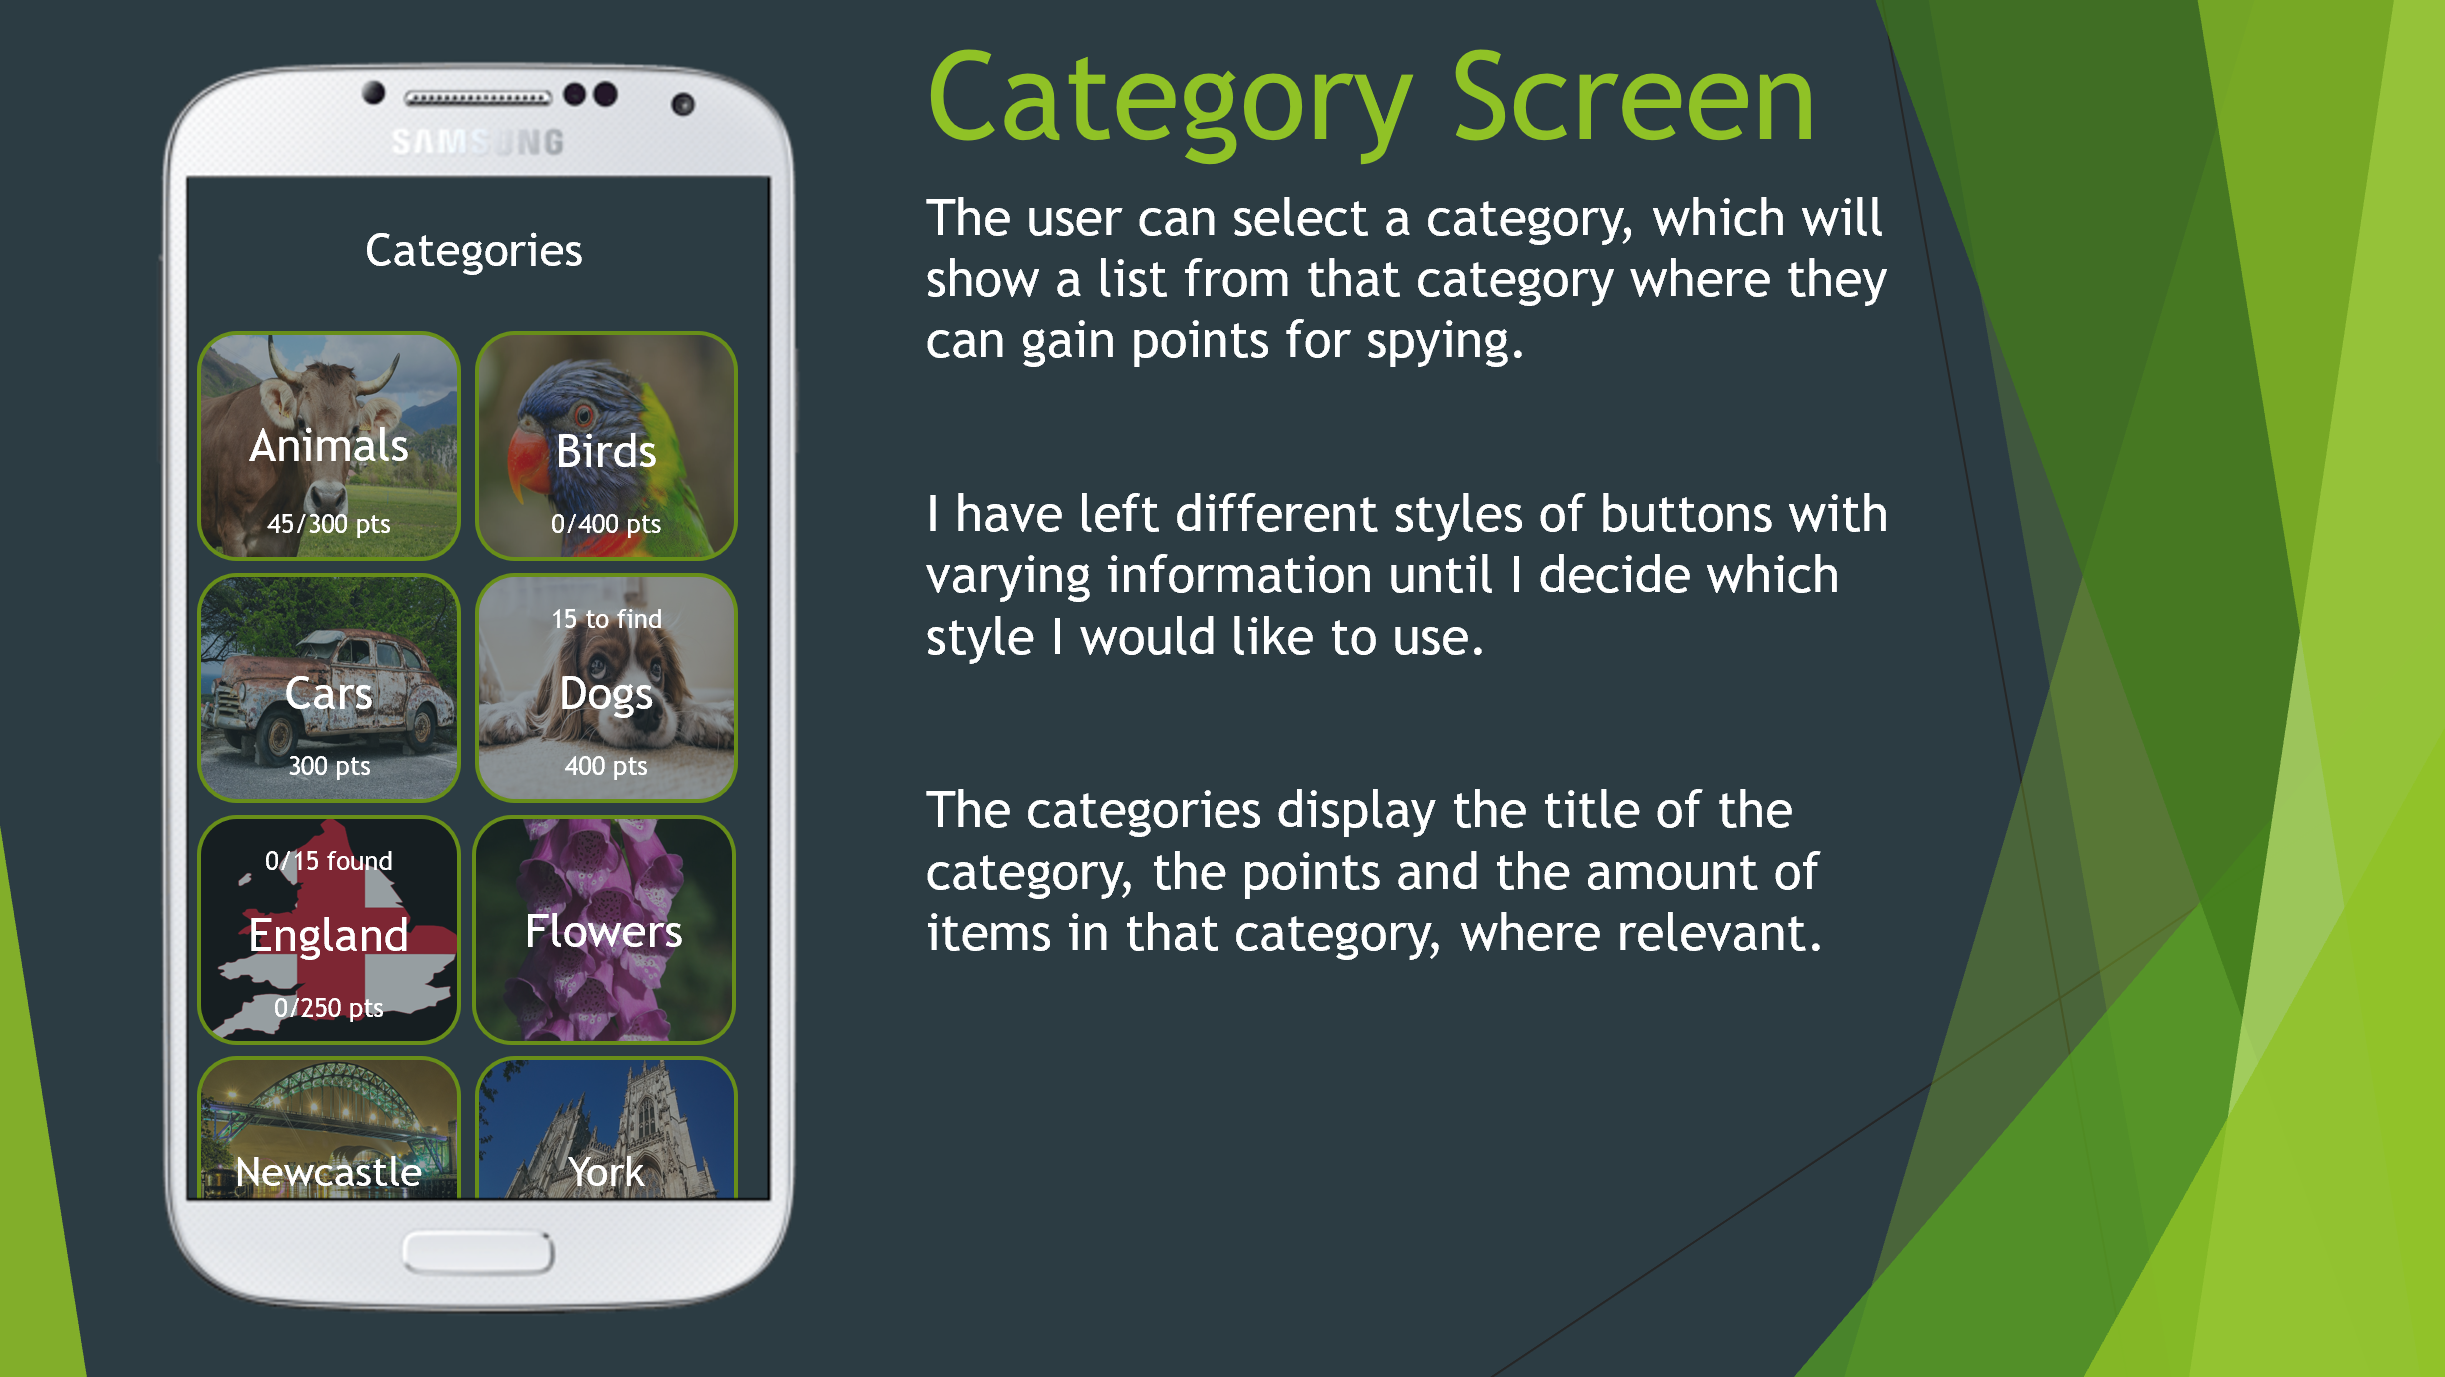
Moodboard, Fontboard, Storyboard and Business Case
This stage was designing and developing ideas for the app, once I had started the storyboard I had a pretty good idea of what I wanted the app to look like.
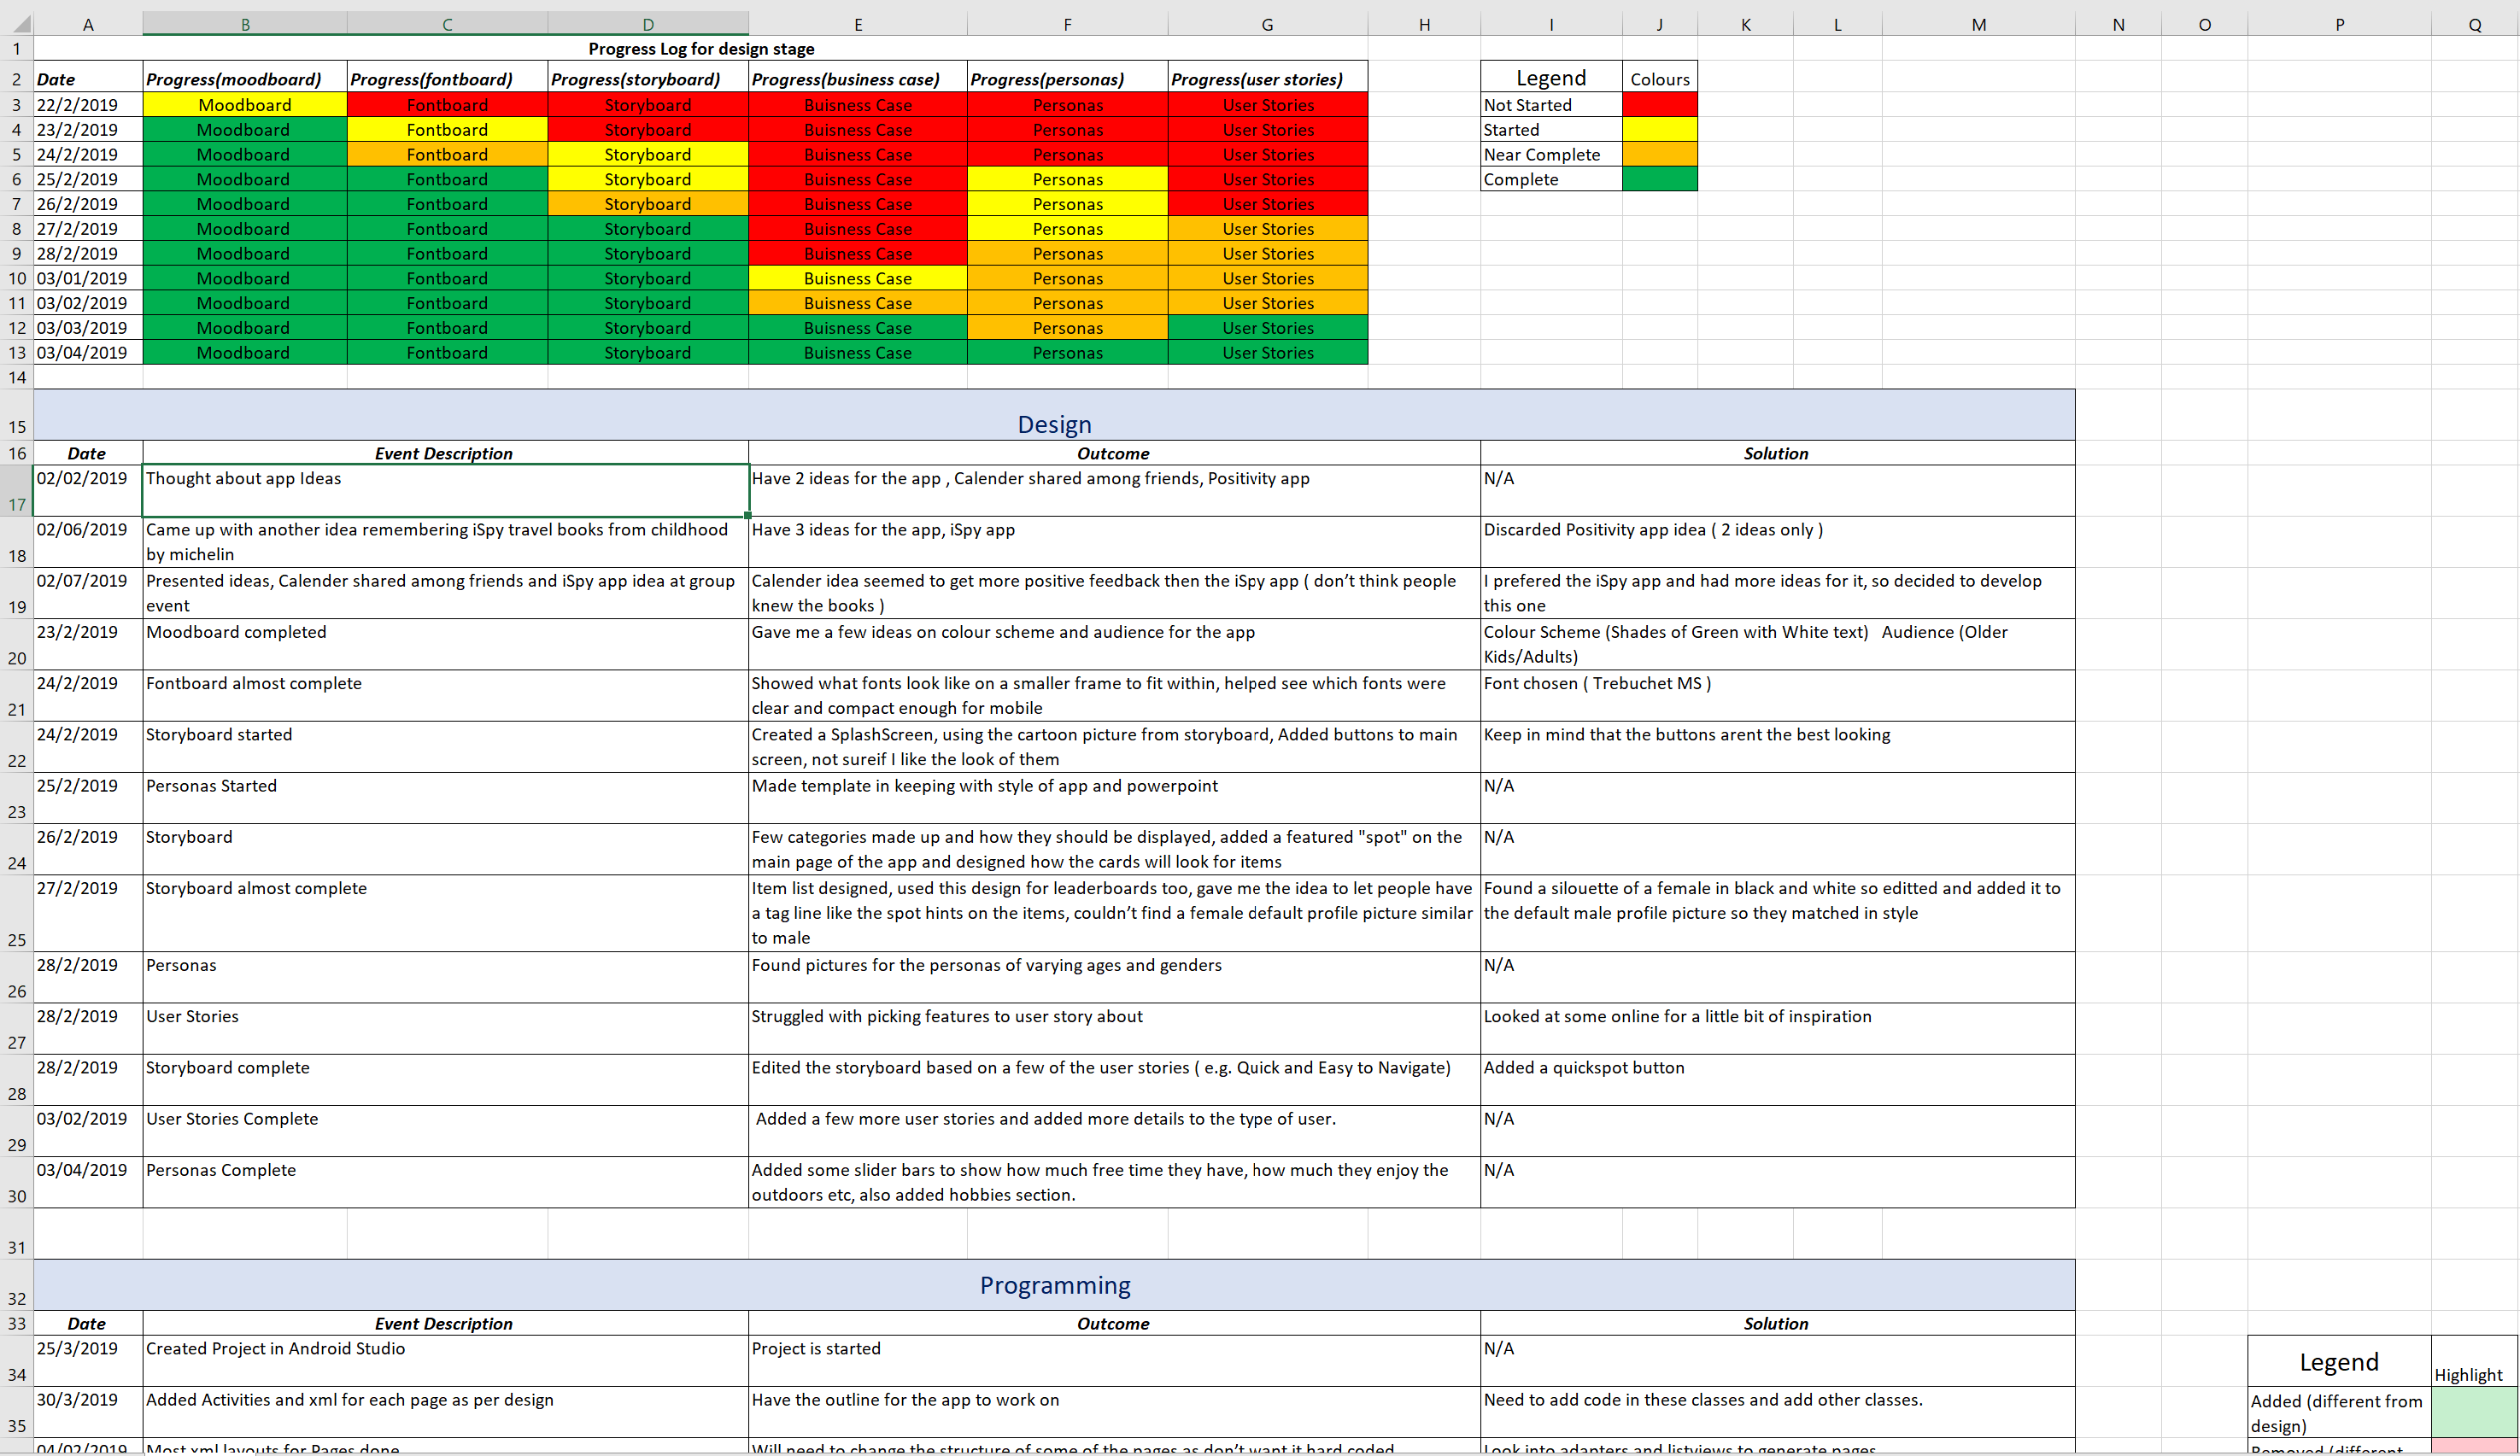
I also kept track of any ideas or problems I came across for the app in a spreadsheet
Coding the App
In this stage I programmed my app using Android Studio, I used Java for this rather then Kotlin.
The embedded Youtube video shows the app in action with voice over explaining what I am doing on the app.
I then wrote a reflective essay on my experience designing and programming the app, highlighting what went right and what went wrong, as well as what I had learnt from this assignment.
What 'off' earth is Space Chess?
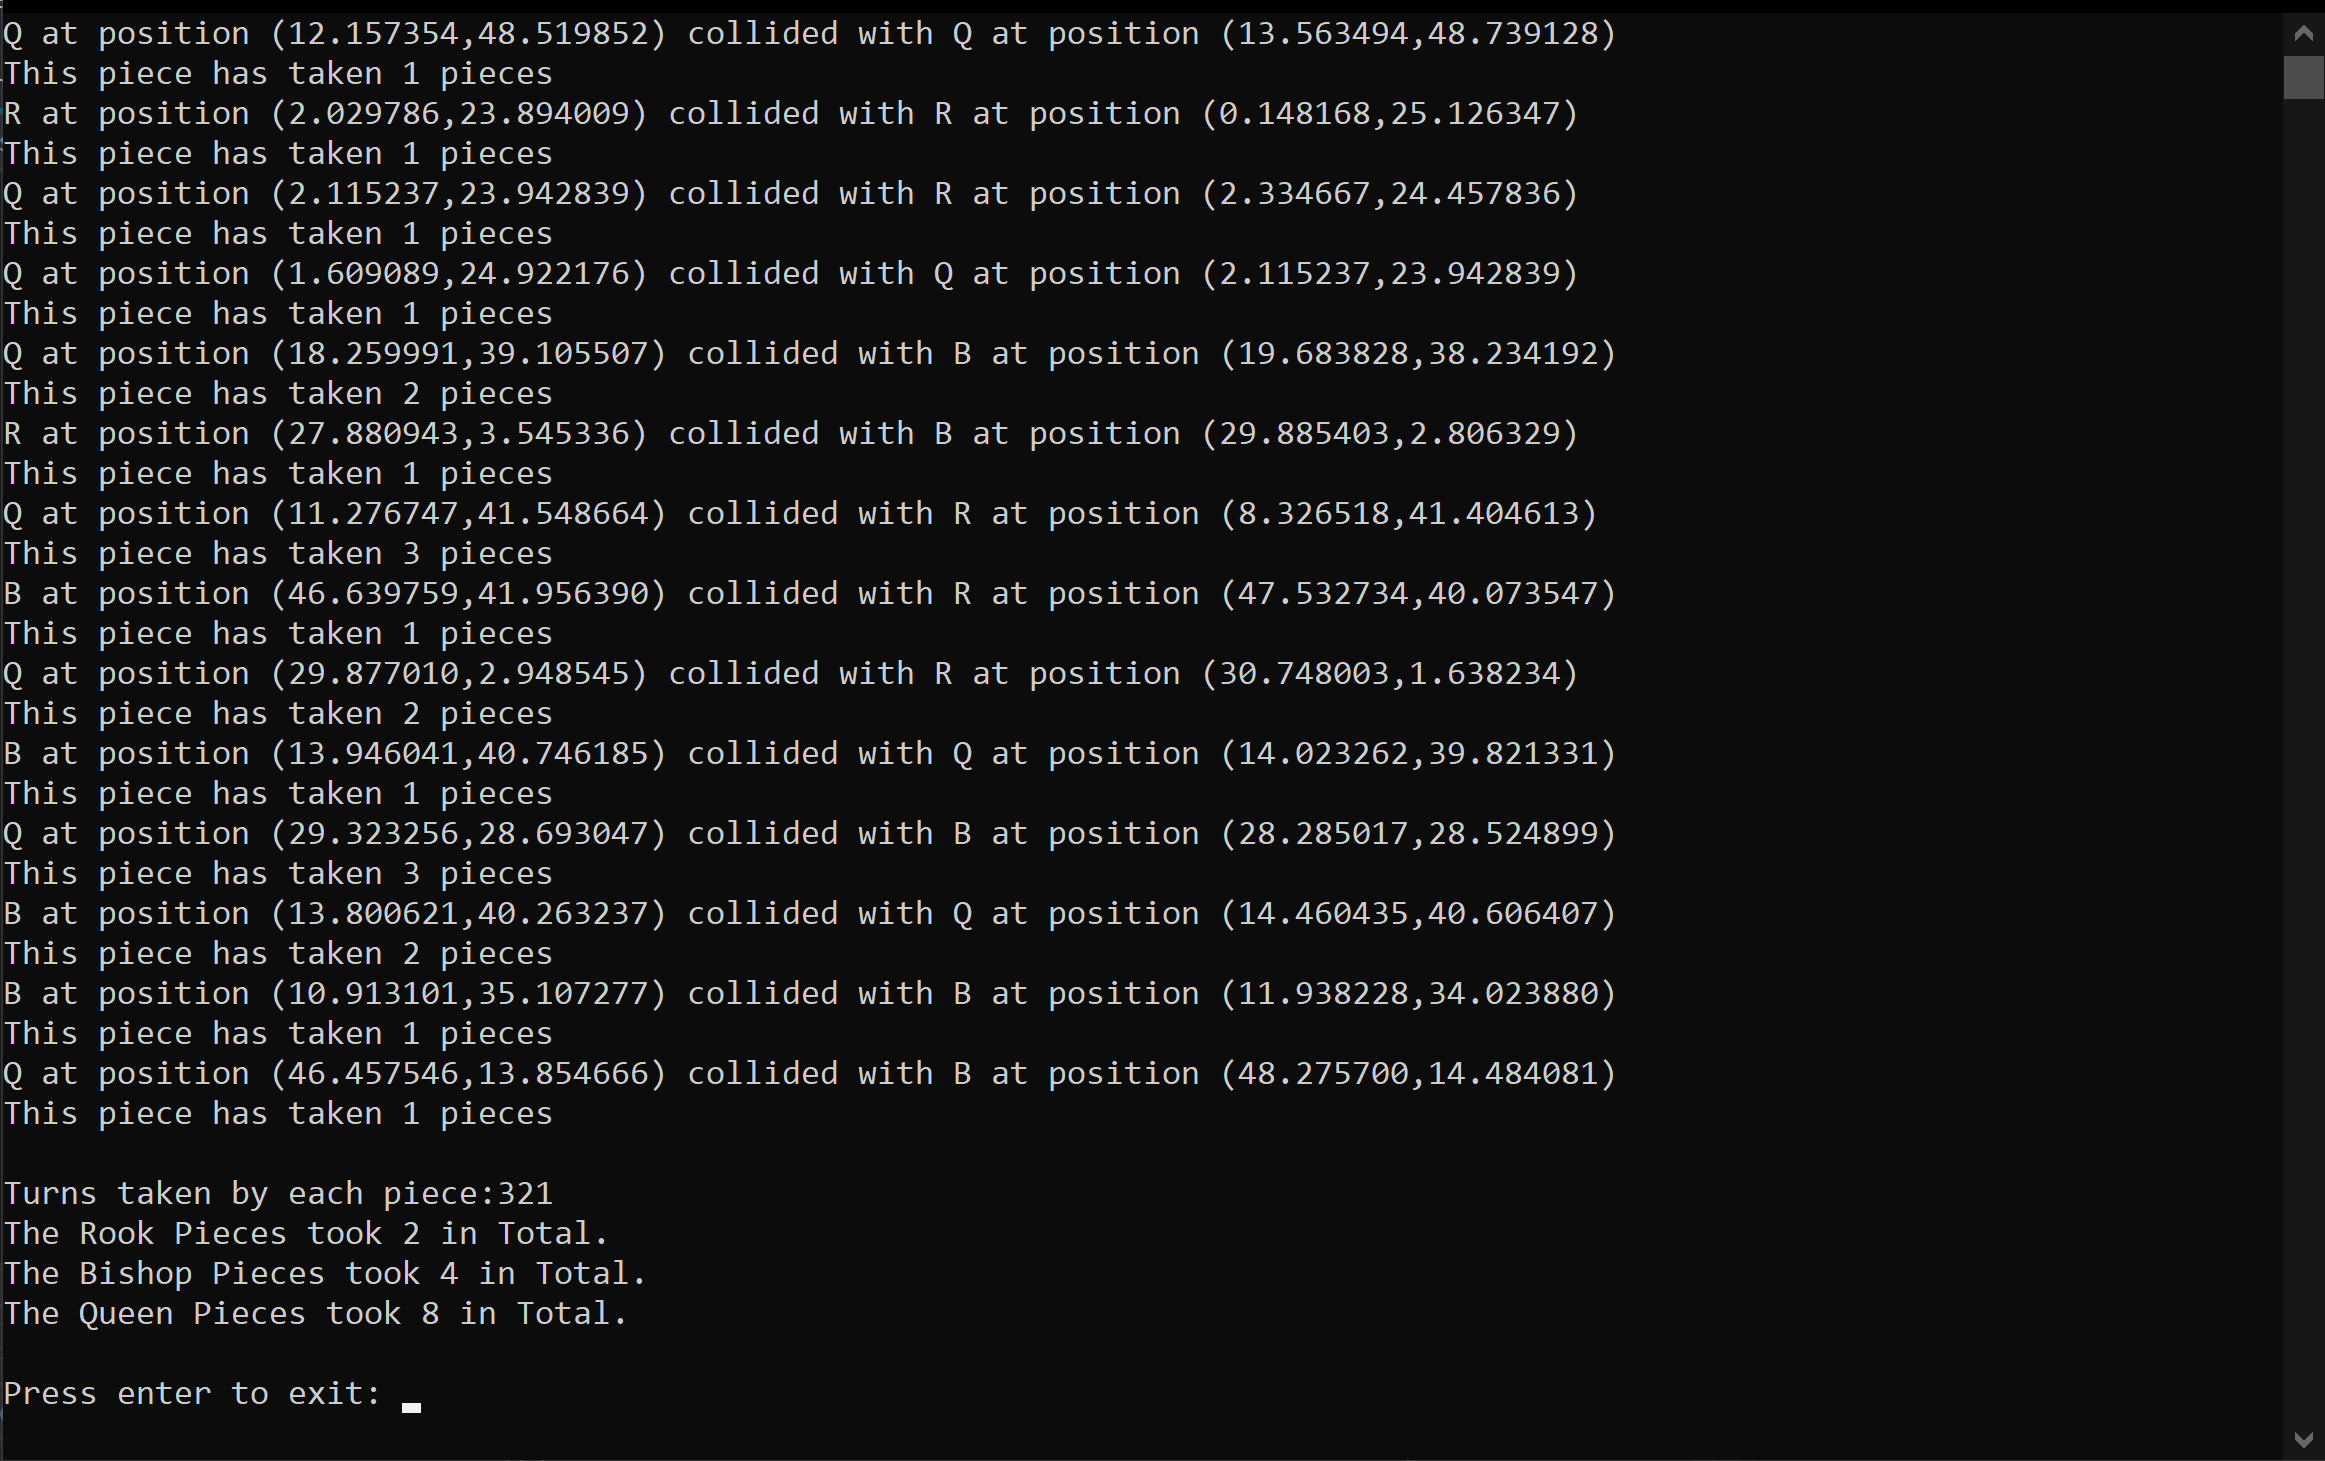
The task for this assignment was to create a simulation of a Rook , Bishop, and Queen on a board, these pieces could move any distance by teleportation within the board including non-integer values (unlike chess).
I learnt a lot about polymorphism and inheritance as well as collision detection of simple shapes within a 2d space.
Show me the code! (Game.cpp)
/**
Space Chess, Game.cpp
Purpose: Test Space Chess

@author Steven Kirby
@date 07/12/18
*/

#include "Piece.h"
#include "Queen.h"
#include "Bishop.h"
#include "Rook.h"
#include <time.h>
#include <iostream>
#include <vector>
#include <string>


using namespace std;

int main() {

	const int MAX_TURNS = 1000;
	const int PIECE_QUANTITY = 5;

	//counter for how many turns has been had
	int turns = 0;

	//total scores{Rook, Bishop, Queen}
	int piecesScore[] = {0,0,0};

	vector<Piece*> pieces;

	//random seed
	srand(time(NULL));

	// For loop creates PIECE_QUANTITY of each piece and places the pointer to the piece in the vector pieces
	for (int i = 0; i < PIECE_QUANTITY; i++) {
		Piece* p1 = new Rook;
		Piece* p2 = new Queen;
		Piece* p3 = new Bishop;

		pieces.emplace_back(p1);
		pieces.emplace_back(p2);
		pieces.emplace_back(p3);
	}

	// Runs whilst there is more then 1 piece and we havent exceeded MAX_TURNS
	while (pieces.size() > 1 && turns < MAX_TURNS) {

		// Move each piece in turn
		for (int i = 0; i < pieces.size(); i++) {
			pieces[i]->Move();

			// Check if this piece has collided with all other pieces, if it has add to total score for this piece type, and call deconstructor for other piece that was "captured" and remove from vector
			for (int j = 0; j < pieces.size(); j++) {
				if (pieces[i]->CheckCollision(pieces[j]) == true) {
					pieces[i]->AddScore(piecesScore);
					pieces[j]->~Piece();
					pieces.erase(pieces.begin() + j);

					// Move onto next piece as shouldnt capture more then 1 piece each turn
					break;
				}
			}

		}
		turns++;
	}


	// Print totals information
	cout << endl << "Turns taken by each piece:" << turns << endl;
	cout << "The Rook Pieces took " << piecesScore[0] << " in Total." << endl;
	cout << "The Bishop Pieces took " << piecesScore[1] << " in Total." << endl;
	cout << "The Queen Pieces took " << piecesScore[2] << " in Total." << endl;

	// Stop program from ending automatically, and allow user to exit
	cout << endl << "Press enter to exit: ";
	cin.ignore();
}
Show me the code! (Piece.cpp)
/**
Space Chess, Piece.cpp
Purpose: Abstract Chess Piece type

@author Steven Kirby
@date 07/12/18
*/

#include <string>
#include "Piece.h"
#include <iostream>
#include <algorithm>


//Limit the shapes
enum class shape { circle, square };

//Shorten main body of code when printing information using a info function with limited options
enum class info { p_position, p_symbol, e_collision, p_score };


/**
	Piece constructor, assigns shape based on symbol it recieves and assigns a random x,y position within the grid
	@param sym takes in a representative symbol of a piece type
*/
Piece::Piece(char sym)
{

	this->symbol = sym;

	//if its a rook, its a square shape, else its a circle shape
	this->shape = (this->symbol == 'R' ? square : circle);

	this->xpos = (float(rand()) / (float(RAND_MAX)) * GRID_X) ;
	this->ypos = (float(rand()) /  (float(RAND_MAX)) * GRID_Y) ;
}

/**
	Destructor frees memory taken by this piece when it is captured
*/
Piece::~Piece()
{
	free(this);
}

/**
	Clamp implementation, keep value between these params
	@param n value being tested
	@param lower the lower bound
	@param upper the upper bound
*/
float Piece::Clamp(float n, float lower, float upper) {
	return std::max(lower, std::min(n, upper));
}

/**
	Function that takes in a enum value and either 1 or 2 pieces to display information about
	@param req Request information
	@param piece Chess piece
	@param other Required for e_collison, 2nd Chess Piece

*/
string Piece::Info(Piece::info req, Piece* piece, Piece* other) {
	//p for position, e for event, i for information
	string str;

	switch (req) {
	case Piece::info::p_position:
		str = "(" + to_string(piece->xpos) + "," + to_string(piece->ypos) + ")";
		return str;
	case Piece::info::p_symbol:
		str = piece->symbol;
		return str;
	case Piece::info::e_collision:
		str = Info(Piece::p_symbol, piece) + " at position " + Info(Piece::p_position, piece) + " collided with " + Info(Piece::p_symbol, other) + " at position " + Info(Piece::p_position, other);
		return str;
	case Piece::info::p_score:
		str = "This piece has taken " + to_string(piece->takes) + " pieces";
		return str;
	default:
		return "ERROR";
	};
}


/**
	Method to check whether this piece collides with another
	@param other The other piece to check
*/
bool Piece::CheckCollision(Piece * other)
{
	//cout << "checking" << endl;
	if (this == other) {
		return false;
	}

	/*	Switch case checks what shape is colliding with what, it has the form
	circle(this)
	|  |
	|  ---circle(other)
	|  |
	|  ---square(other)
	|  |
	|  ---default;
	|
	square(this)
	|  |
	|  ---circle(other)
	|  |
	|  ---square(other)
	|  |
	|  ---default;
	|
	default;
	*/
	switch (this->shape) {
	case circle: {
		switch (other->shape) {
		case circle: {
			//SOHCAHTOA ( a^2 + b^2 = c^2)
			//Difference of x positions squared + Difference of y positions squared < Radius1 + Radius2 (same for these) squared
			if (fabs(((this->xpos - other->xpos) * (this->xpos - other->xpos)) + ((this->ypos - other->ypos) * (this->ypos - other->ypos))) < ((this->RADIUS + other->RADIUS) * (this->RADIUS + other->RADIUS))) {
				cout << Info(e_collision, this, other) << endl;
				return true;
			}
			return false;
			break;
		}
		case square: {

			//Clamp returns the max value between (other->xpos) and (minimum between other->xpos + side length or this->xpos)
			float deltaX = this->xpos - Clamp(this->xpos, other->xpos, other->xpos + SIDE);
			float deltaY = this->ypos - Clamp(this->ypos, other->ypos, other->ypos + SIDE);

			//SOHCAHTOA again
			if (((deltaX * deltaX) + (deltaY*deltaY)) < (this->RADIUS * this->RADIUS)) {
				cout << Info(e_collision, this, other) << endl;
				return true;
			}
			return false;
			break;
		}
		default: {
			return false;
			break;
		}
		}
		return false;
		break;
	} // end of this == circle case

	case square: {
		switch (other->shape) {
		case circle: {
			//as above
			float deltaX = other->xpos - Clamp(other->xpos, this->xpos, this->xpos + SIDE);
			float deltaY = other->ypos - Clamp(other->ypos, this->ypos, this->ypos + SIDE);

			if (((deltaX * deltaX) + (deltaY*deltaY)) < (other->RADIUS * other->RADIUS)) {
				cout << Info(e_collision, this, other) << endl;
				return true;
			}
			return false;
			break;
		}
		case square: {

			//find the minimum and maximum x and y values
			float x1Min = this->xpos - (SIDE / 2);
			float y1Min = this->ypos - (SIDE / 2);
			float x1Max = this->xpos + (SIDE / 2);
			float y1Max = this->ypos + (SIDE / 2);
			float x2Min = other->xpos - (SIDE / 2);
			float y2Min = other->ypos - (SIDE / 2);
			float x2Max = other->xpos + (SIDE / 2);
			float y2Max = other->ypos + (SIDE / 2);

			//if one rectangle is to the left of the other completely then they haven't collided
			if (x1Min > x2Max || x1Max < x2Min) {
				return false;
			}
			//if one rectangle is above the other completely then they haven't collided
			else if (y1Min > y2Max || y1Max < y2Min) {
				return false;
			}
			//Must of collided so return true;
			else {
				cout << Info(e_collision, this, other) << endl;
				return true;
			}
			return false;
			break;
		}
		}
		return false;
		break;
	} // end of this == square case

	default: {
		return false;
		break;
	}
	} // end of switch


}

/**
	Adds a score to individual piece takes and displays how many pieces this piece has taken
	@param pieceScore Needs to be passed for derivitives to take in the array
*/
void Piece::AddScore(int pieceScore[])
{
	this->takes += 1;
	cout << Info(p_score, this) << endl;
}
Show me the code! (Queen.cpp)
/**
Space Chess, Queen.cpp
Purpose: A Queen Chess Piece type

@author Steven Kirby
@date 07/12/18
*/

#include "Queen.h"

/**
Calls Piece constructor with 'Q' symbol
*/
Queen::Queen() : Piece('Q')
{

}


Queen::~Queen()
{

}

/**
	Adds to total score of Queen pieces (hard coded) and adds to each pieces individual takes
	@param pieceScore array of total scores for pieces
*/
void Queen::AddScore(int pieceScore[]) {
	Piece::AddScore(pieceScore);
	pieceScore[2] += 1;
}

/**
	Queen can randomly move diagonally in either of 4 directions with equal distance moved x and y (direction can vary)like a bishop or like
	a rook can also randomly move horizontally or vertically in any of 4 directions
*/
void Queen::Move()
{
	//Random whether going to be like a rook or like a bishop this move
	bool diagOrStr = rand() % 2;

	if (diagOrStr) {

		//see Bishop Move()
		float dis;
		int dir;
		dis = (float(rand()) / float(RAND_MAX)) * MAX_DISTANCE;
		dis = (dis == 0.0f) ? 0.1f : dis;

		do {
			dir = (rand() % 2);
			dir = (dir == 0) ? -1 : 1;
		} while ((dir == 1) ? (dis + xpos) > GRID_X : (-dis + xpos) < 0);
			xpos = Clamp((dis * dir) + xpos, 0.0f, GRID_X);
		do {
			dir = (rand() % 2);
			dir = (dir == 0) ? -1 : 1;
		} while ((dir == 1) ? (dis + ypos) > GRID_Y : (-dis + ypos) < 0);
			ypos = Clamp((dis * dir) + ypos, 0.0f, GRID_Y);

	}
	else {

		//see Rook Move()
		float dis;
		bool dir = rand() % 2;
		do {
			dis = ((float(rand()) / float(RAND_MAX)) * (MAX_DISTANCE + MAX_DISTANCE)) - MAX_DISTANCE;
			dis = (dis == 0.0f) ? 0.1f : dis;
		} while ((dir) ? (dis + xpos) < 0 || (dis + xpos) > GRID_X : (dis + ypos) < 0 || (dis + ypos) > GRID_Y);

		if (dir) {
			xpos = Clamp(dis + xpos, 0.0f, GRID_X);
		}
		else {
			ypos = Clamp(dis + ypos, 0.0f, GRID_Y);
		}
	}

}
Game Development - Godot
Link above takes you to a 'playable in browser' version of this prototype game.
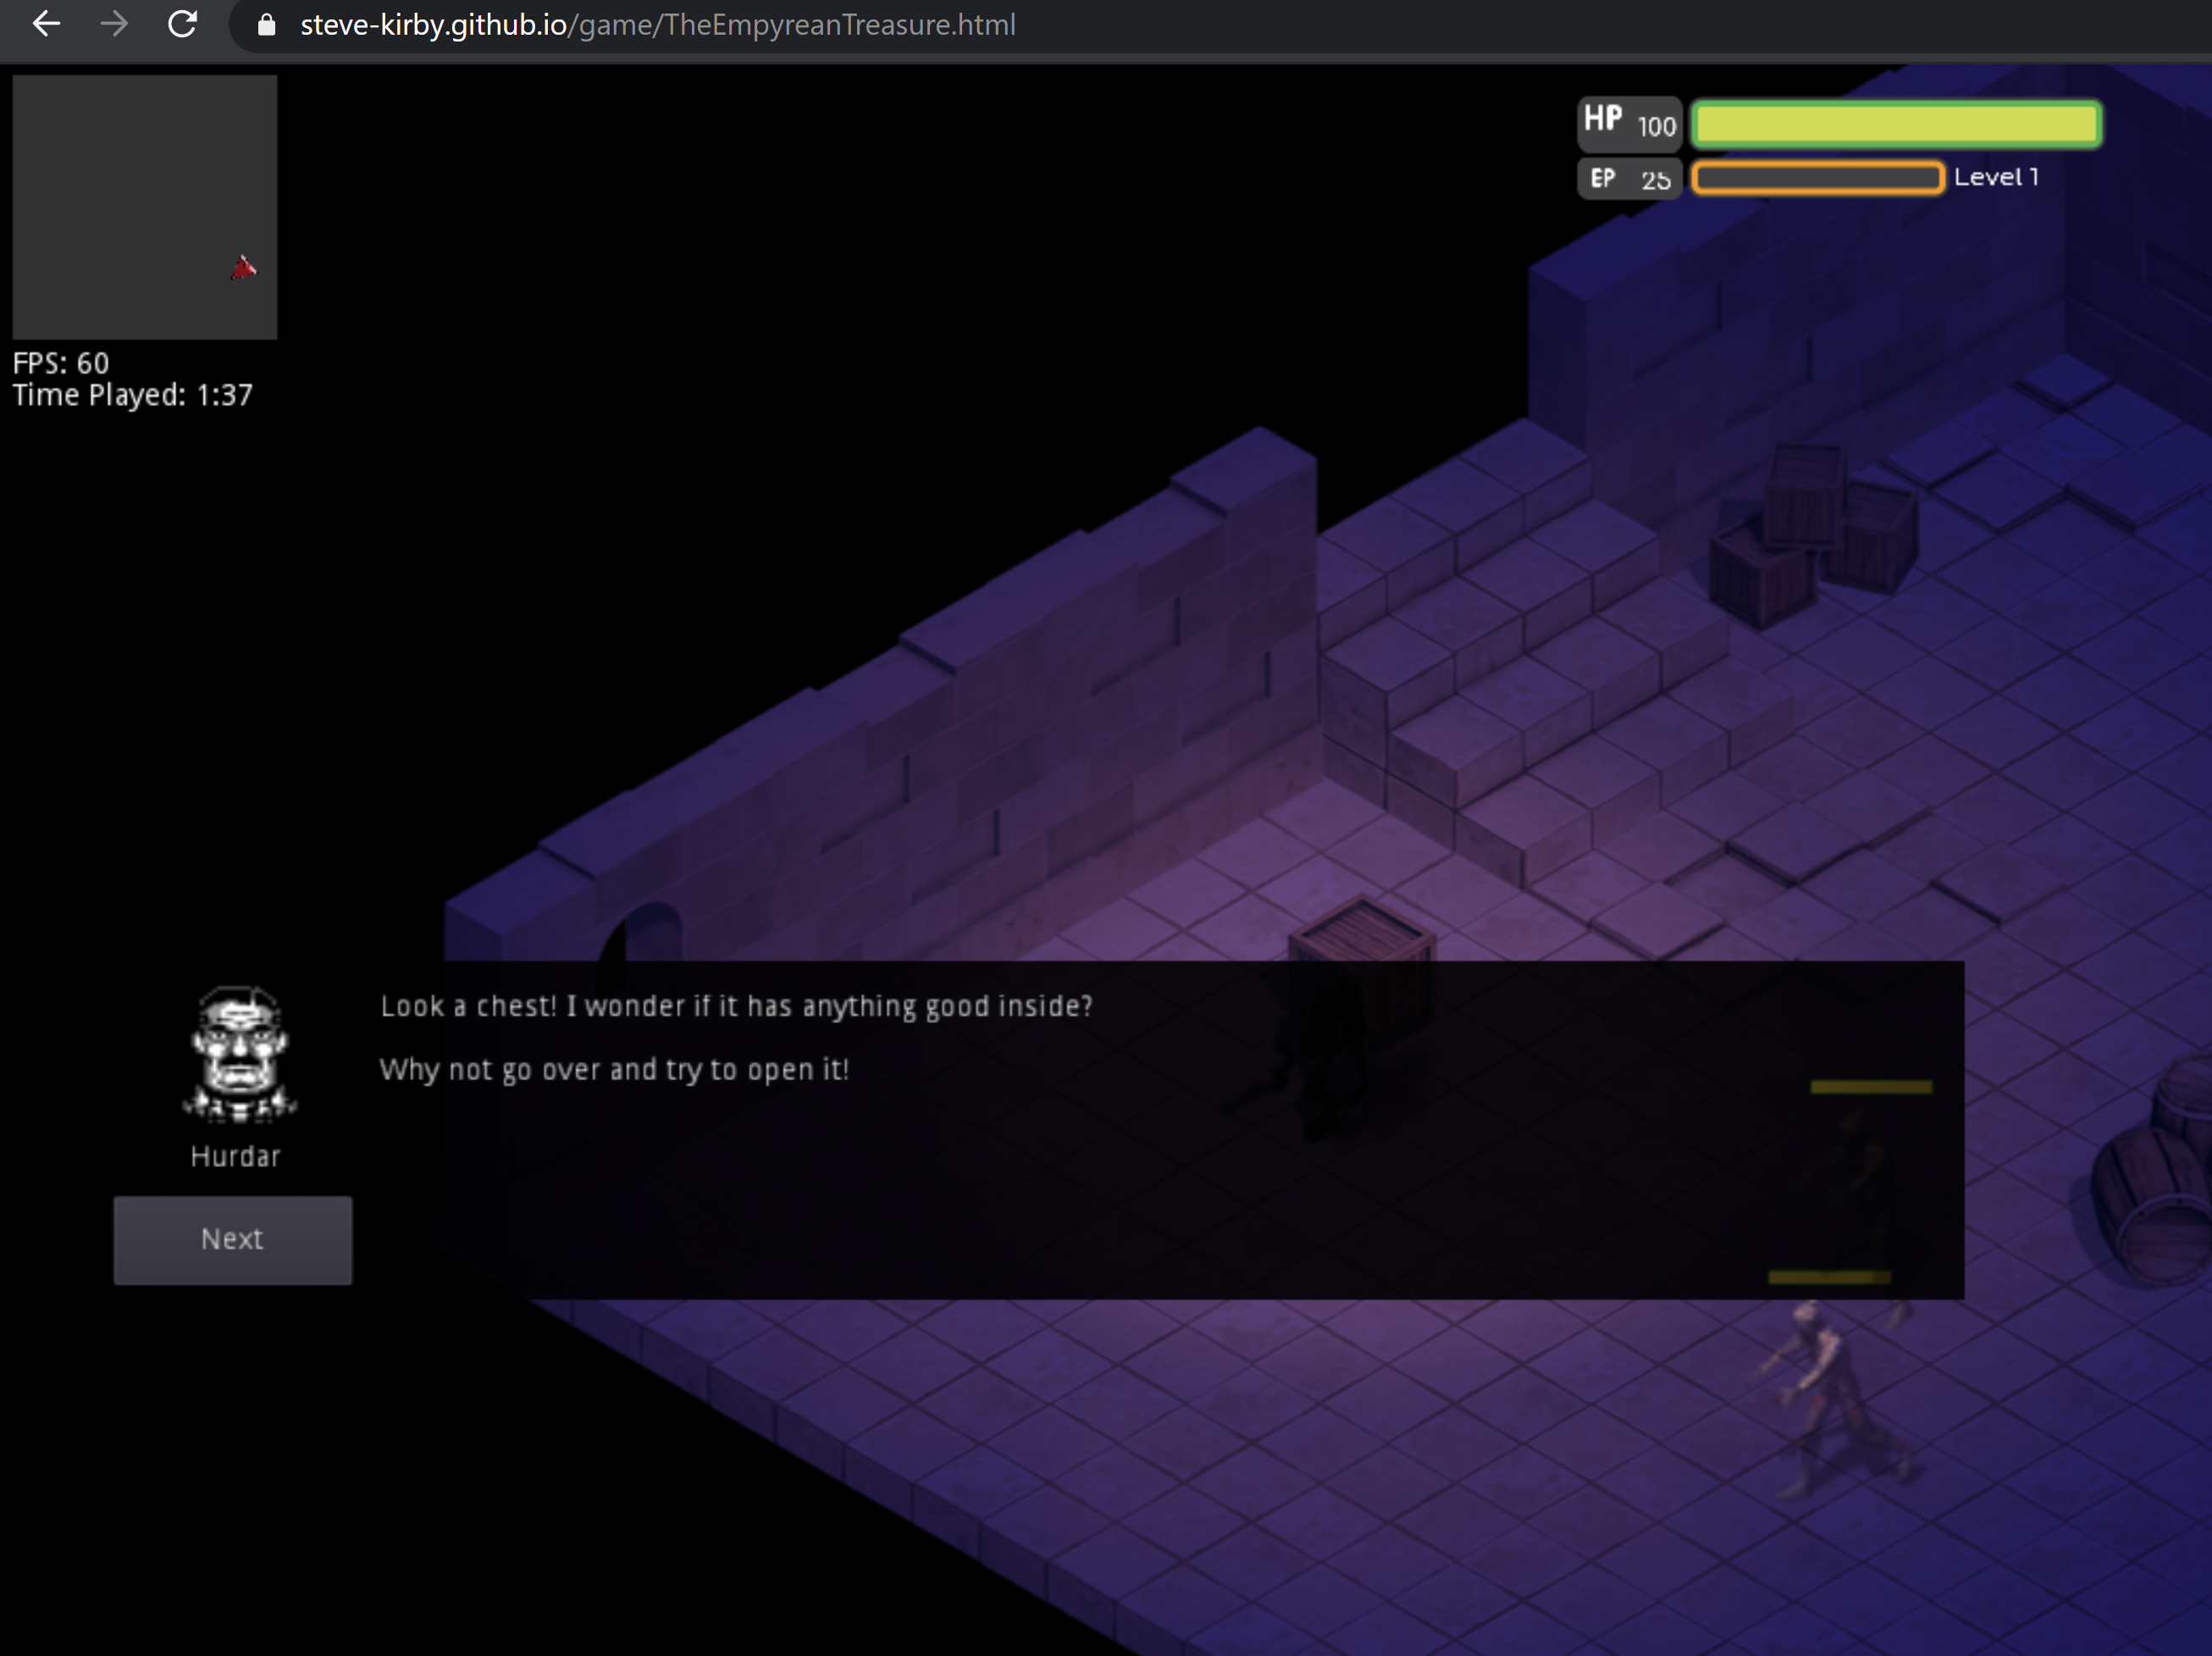
Godot - Exported to HTML
The screenshot shows the game in action, it isn't perfect and was extremely ambitious for the time I had, alongside looming deadlines for other modules and my dissertation. More importantly I learned a lot about Godot and game development in general whilst making this prototype game.
Team Project - Seaton Valley Council - Android App
Link above leads to a git repository with only the code which was written by myself or a team member for this app and as such will not work as an imported project.

As part of our Software Engineering - Group Project module we were to design and develop an android app, this could be a variety of different options chosen by the university.
We decided as a group to take on the Seaton Valley Council app, which could provide information to residents of the parish.
The gif here shows the app in use, for this project I was lead programmer along with 2 other programmers and 2 testers, ensuring any code pushed using gitlab was functional and could integrate with previous code.
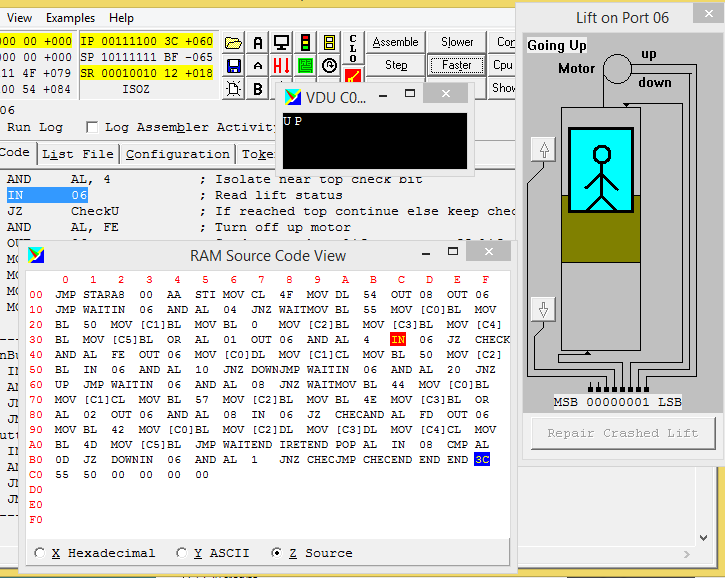
Lift Simulator
Using assembly language, we were tasked with controlling a lift.
We had a very limited amount of memory to work with.
This was the first time delving into a completely different type of programming, I had completed a few smaller tasks to help learn for this assignment including a traffic light control system.
Show me the code!
; ----- LIFT --------------------------
	JMP	Start		; Skip the db's
	db	A8		; Code for Timer Interupt stored in A8
	db	00		; Keyboard Interupt not used
	db 	AA		; Keypad Interupt Code stored in AA

Start:
	STI			; Set the Interupt
	MOV	CL, 4F	;o	; Set Register CL to char o
	MOV	DL, 54	;t	; Set Register DL to char t
	OUT	08		; Display Key Pad
	OUT	06		; Display lift window
	JMP	WaitUpButton	; Jump to check for button pressed

;------------ Display up and start up motor ------------
UP:

	IN	06		; Read Lift Status
	AND	AL, 04		; Isolate Near top check bit
	JNZ	WaitDownButton	; If near top go back to wait for buttons
				; else continue
	MOV	BL, 55		; Display "UP"
	MOV	[C0], BL	; |
	MOV	BL, 50		; |
	MOV	[C1], BL	; v
	MOV	BL, 0		; Clear Excess Letters using null
	MOV	[C2], BL	; |
	MOV	[C3], BL	; |
	MOV	[C4], BL	; |
	MOV	[C5], BL	; v

	OR	AL, 01		; Set UP motor bit
	OUT	06		; Turn on UP motor
;------------ Start checking if near top -----------------
CheckU:
	AND	AL, 4		; Isolate near top check bit
	IN	06		; Read lift status
	JZ	CheckU		; If reached top continue else keep checking
	AND	AL, FE		; Turn off up motor
	OUT	06		; Send command to lift - turns off lift motor
	MOV	[C0], DL	; T
	MOV	[C1], CL	; O
	MOV	BL, 50		; set bl to p
	MOV	[C2], BL	; P

;------------- Check if any buttons have been pressed -----------
WaitDownButton:
	IN	06		; Read lift status
	AND	AL, 10		; Isolate down button
	JNZ	Down		; Jump to down if pressed else continue
	JMP	WaitDownButton  ; Keep checking
WaitUpButton:
	IN	06		; Read Status again
	AND	AL, 20		; Isolate up button
	JNZ	UP		; Jump to up if Pressed else continue
	JMP	WaitUpButton	; Keep checking till button pressed
;------------ Display down and start down motor ----------------
Down:

	IN	06		; Read lift status
	AND	AL, 08		; Isolate near bottom check bit
	JNZ	WaitUpButton	; If near bottom, go back and wait for buttons
				; Else continue
	MOV	BL, 44		; BL set to D
	MOV	[C0], BL	; D
	MOV	[C1], CL	; O
	MOV	BL, 57		; BL set to W
	MOV	[C2], BL	; W
	MOV	BL, 4E		; BL set to N
	MOV	[C3], BL	; N

	OR	AL, 02		; Set Down motor bit
	OUT	06		; Turn on Down motor
;------------ Start checking if lift is at bottom --------------
CheckD:
	AND	AL, 08		; Isolate near bottom check bit
	IN	06		; Read lift status
	JZ	CheckD		; If near bottom continue else keep checking
	AND	AL, FD		; Turn off down motor
	OUT	06		; Send command to lift - turns off lift motor

	MOV	BL, 42		; Set BL to B
	MOV	[C0], BL	; B
	MOV	[C2], DL	; T miss O as this would already be there from dOwn
	MOV	[C3], DL	; T
	MOV	[C4], CL	; O
	MOV	BL, 4D		; Set Bl to M
	MOV	[C5], BL	; M
	JMP	WaitUpButton	; Go back to wait for buttons again

ORG A8
	iret			; Do nothing, return
ORG AA
	POP 	AL		; POP to prevent code overwriting, done first to prevent
				; quick presses of button affecting code

	IN	08		; Port for the peripheral keypad
	CMP	AL,0D		; Check if enter was pressed on pad
	JZ 	DOWN		; If it was jump to Down
	IN	06		; Read Lift Status
	AND	AL, 1		; Check if up motor was on
	JNZ	CheckU		; If it was check if near top to prevent crash
	JMP	CheckD		; Else check if near bottom to prevent crash

END
; --------------------------------------------------------------
Tutorial Website
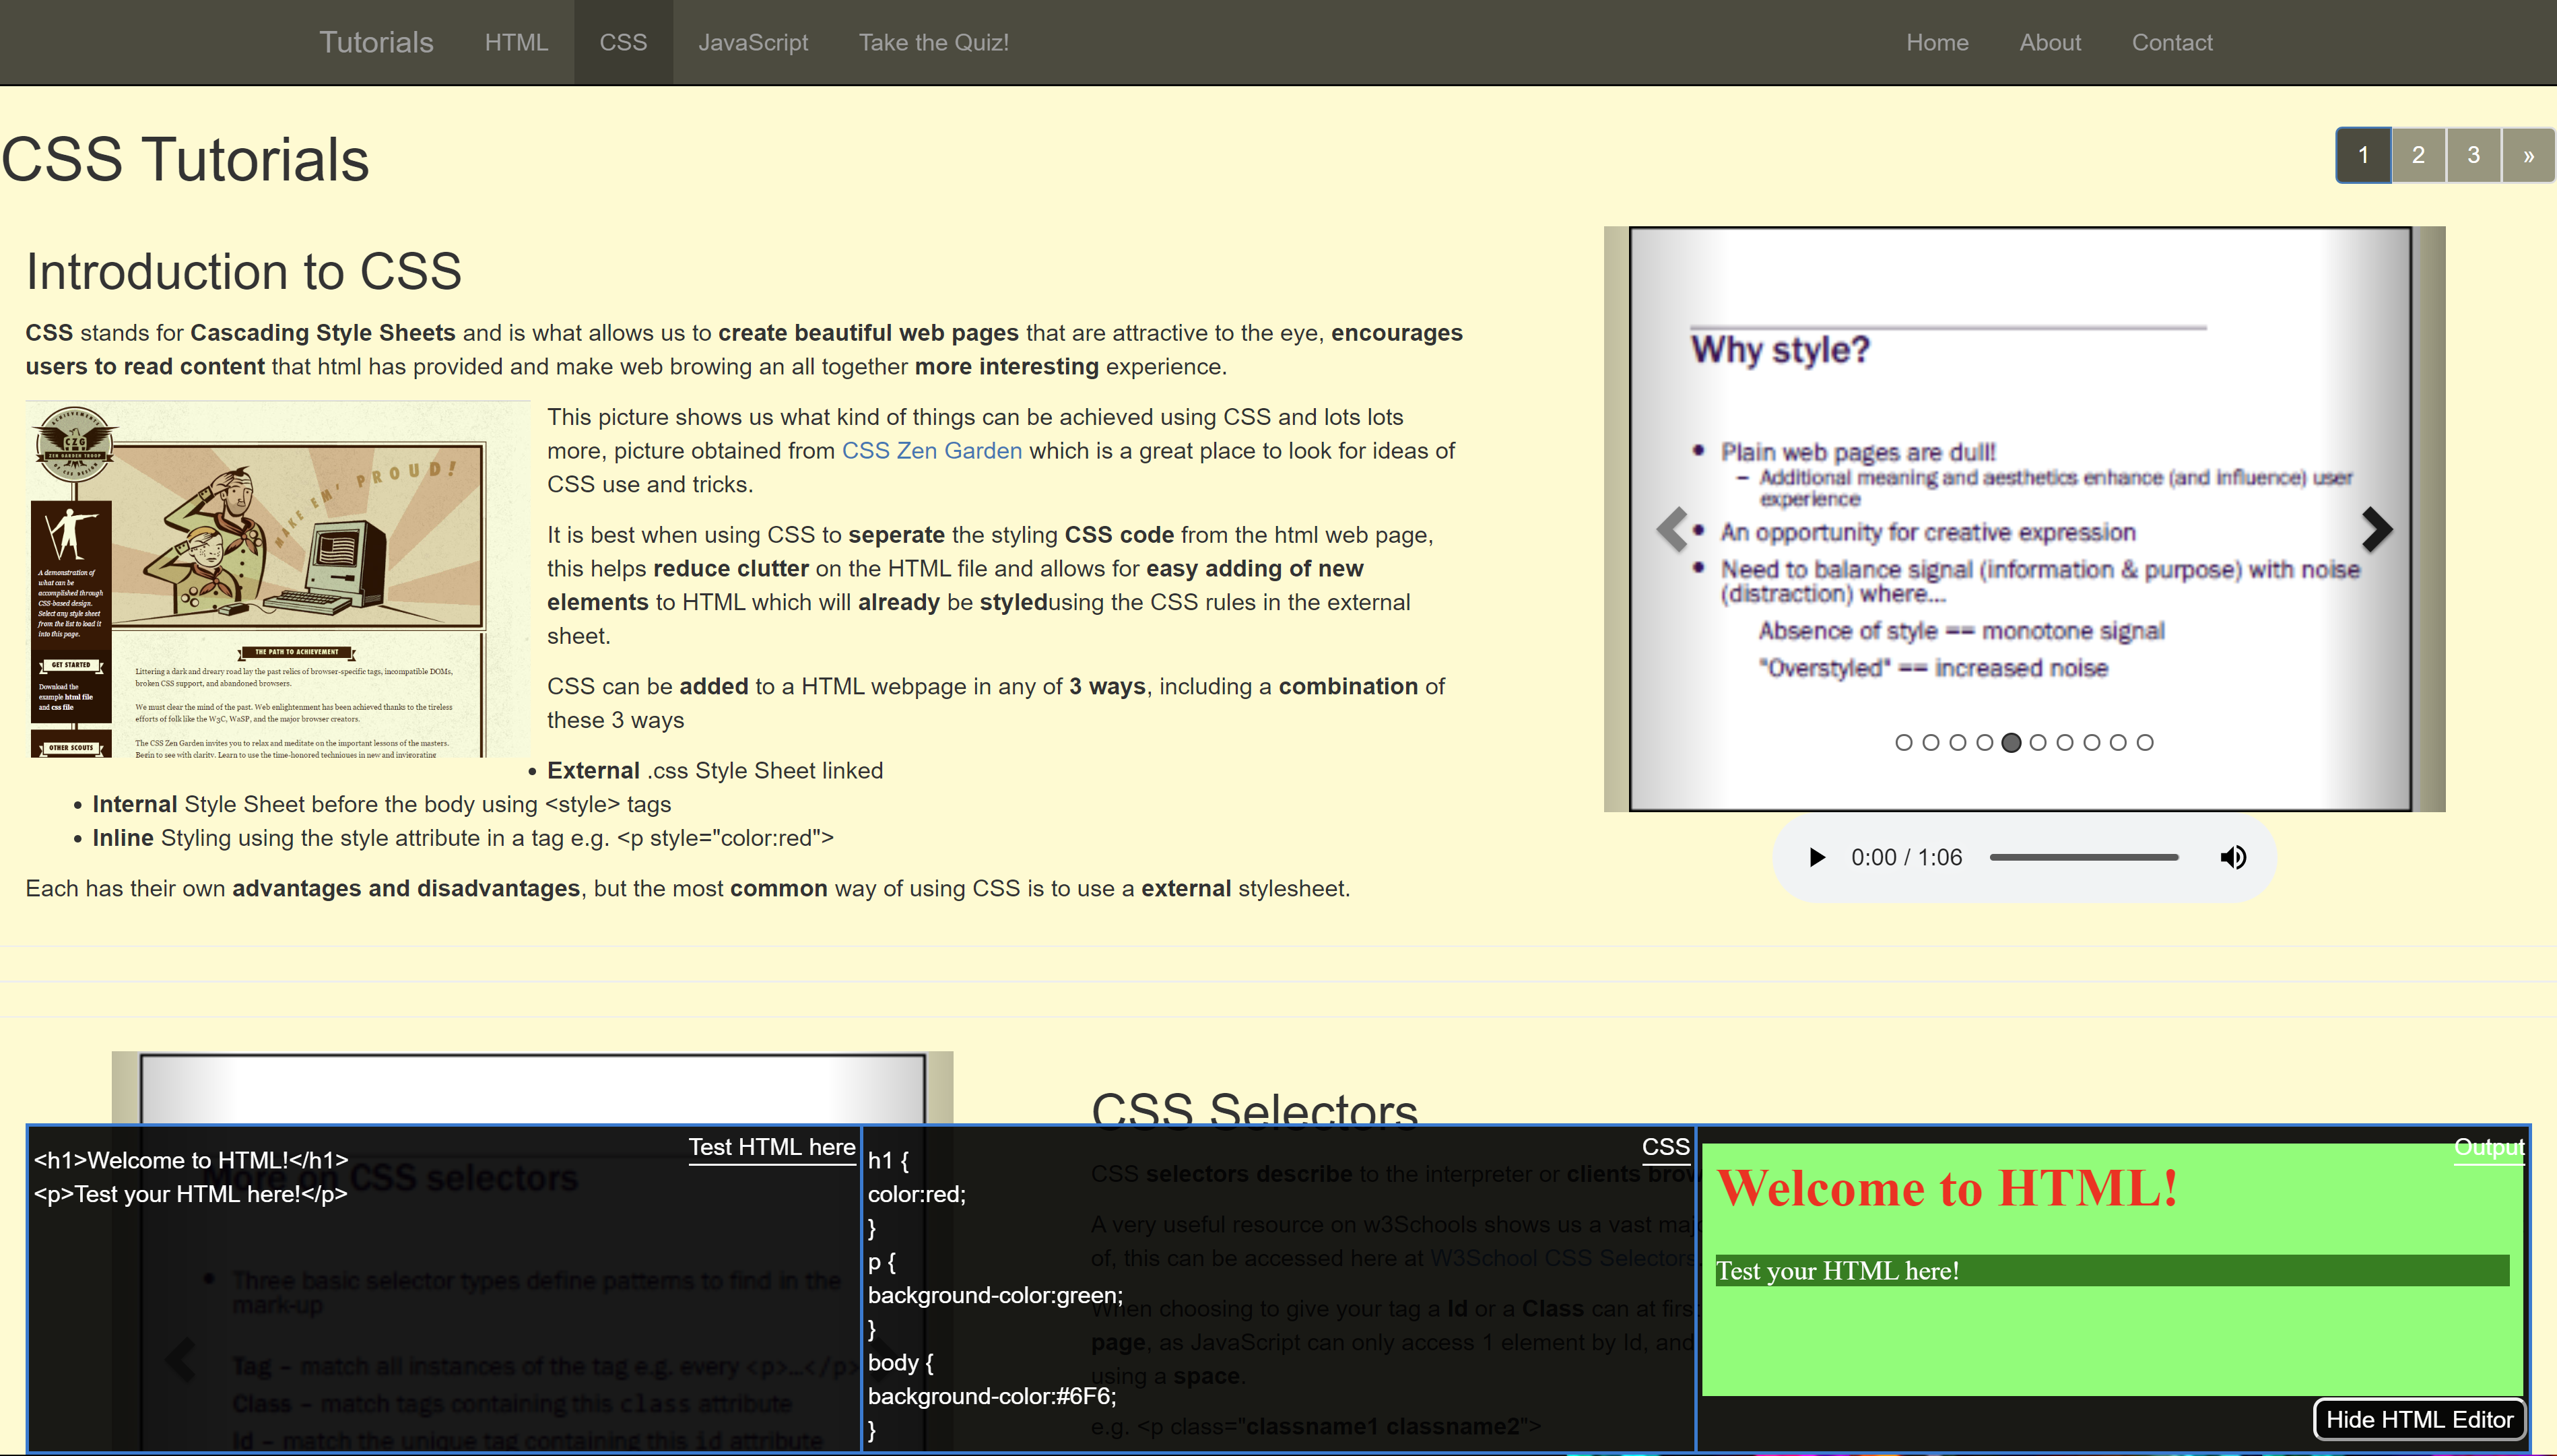
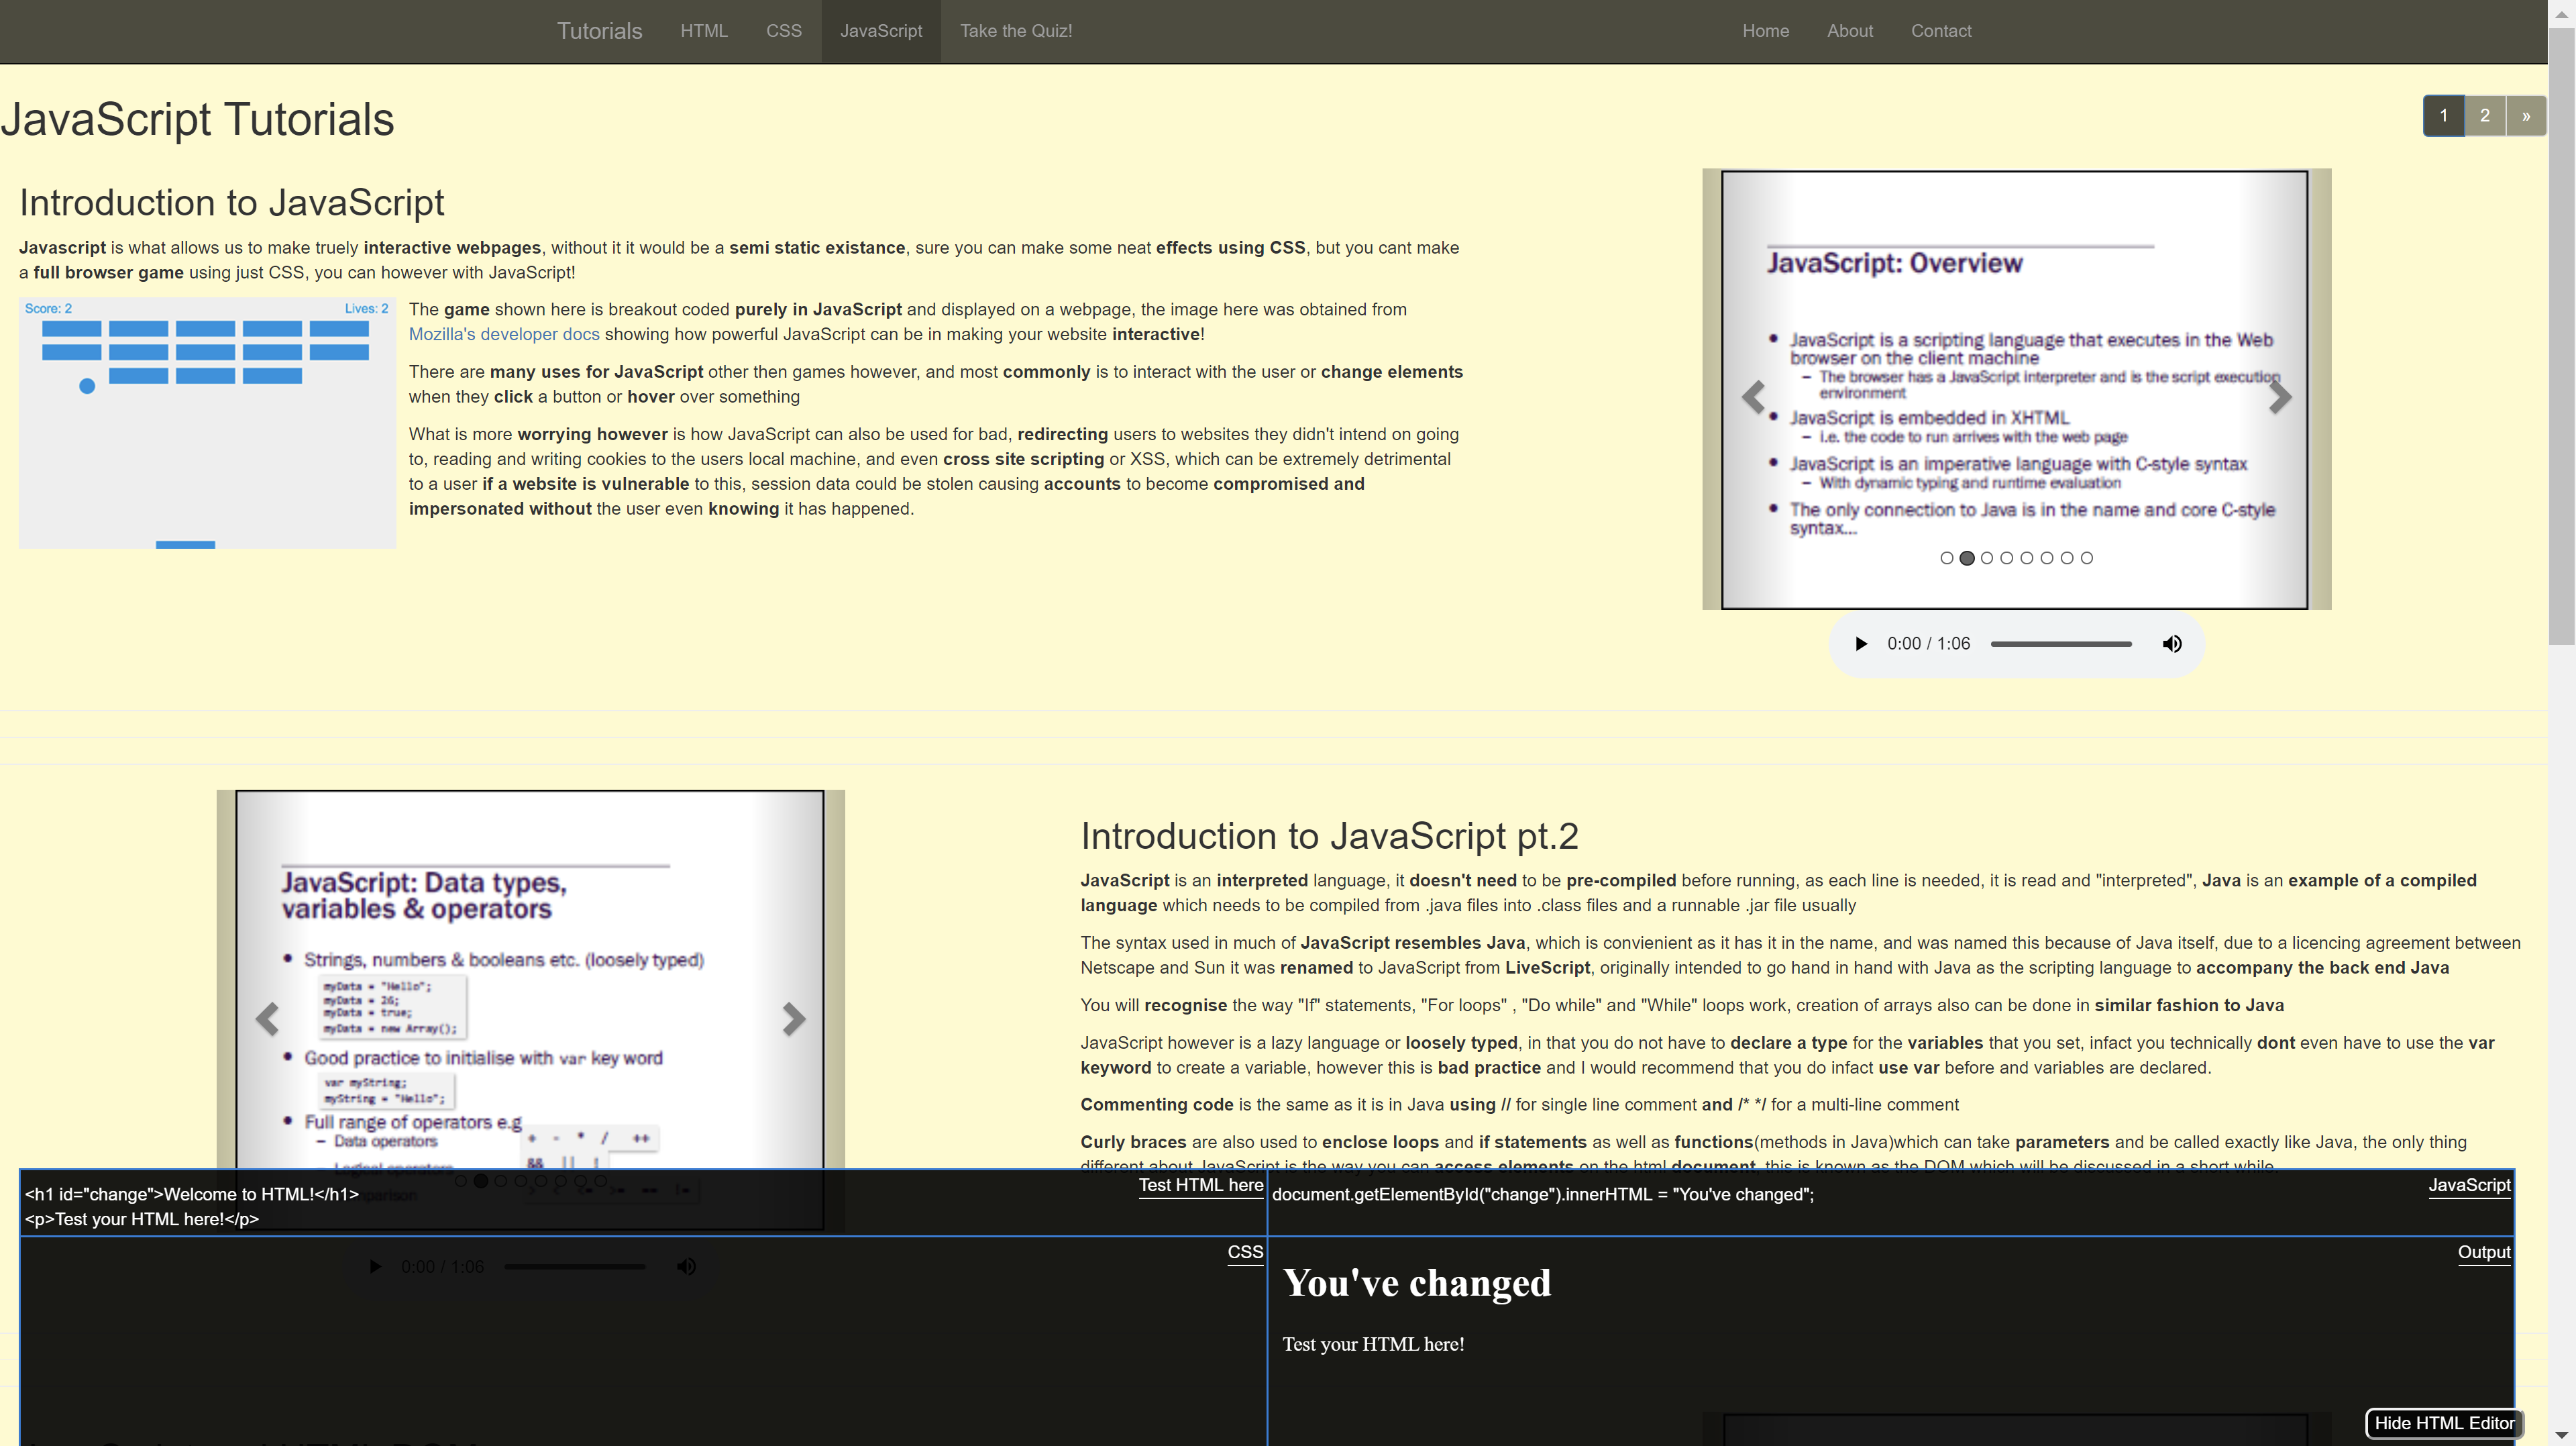
Voice clips and slides from the course are laid out in easy to use sections separating the different topics of the course
The user can use what they learn from the website and gain feedback immediately by using the live HTML, CSS, Javascript testing area, this was adapted from some code found online, the layout changes depending on what section of the tutorial website the user is on (shown in the pictures).
